Creating a full workflow
In this tutorial we will create a full workflow and tie two together using the associated workflow support.
Action Workflow
We are going to create two workflows in this tutorial. The first one will be an action workflow that will handle actions that result from registered messages.
- Lets start by clicking on the
Adminmenu on the left side. This will unfold theAdminmenu. - Next click on the
Workflowslink to go to the overview of the workflows. - Next click the
New Workflowbutton to initiate a new workflow creation.
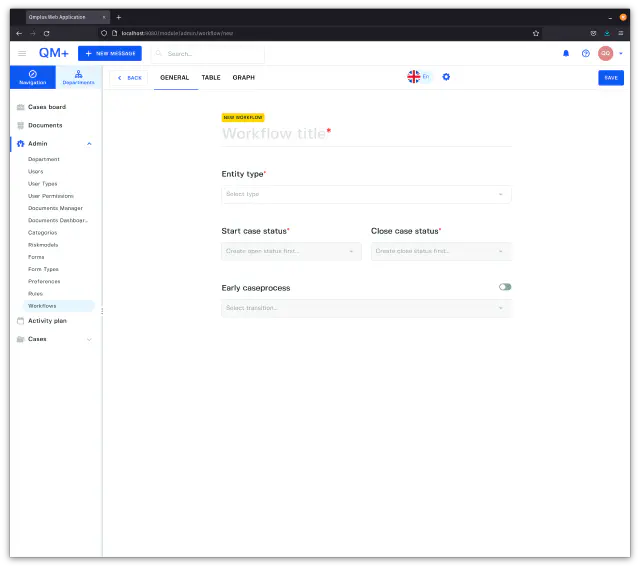
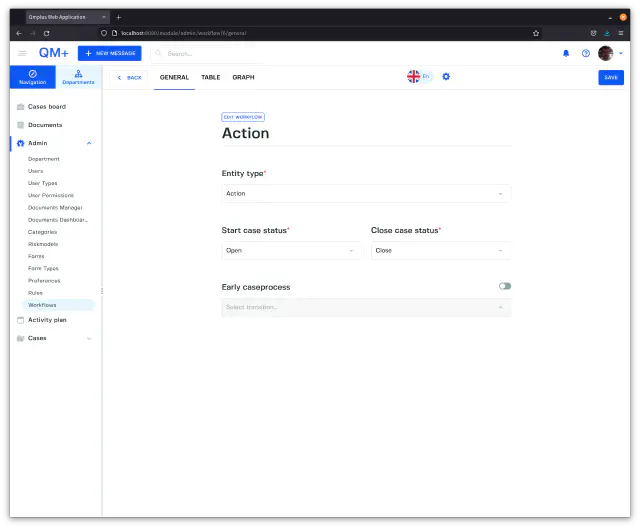
Lets fill in the workflow title and entity type.
- In the
Workflow titleenterAction - For the
Entity typedropdown pick theActionentity type.
Next lets build the workflow itself. Click on the Table tab.

There are three main sections when creating a new workflow. These are.
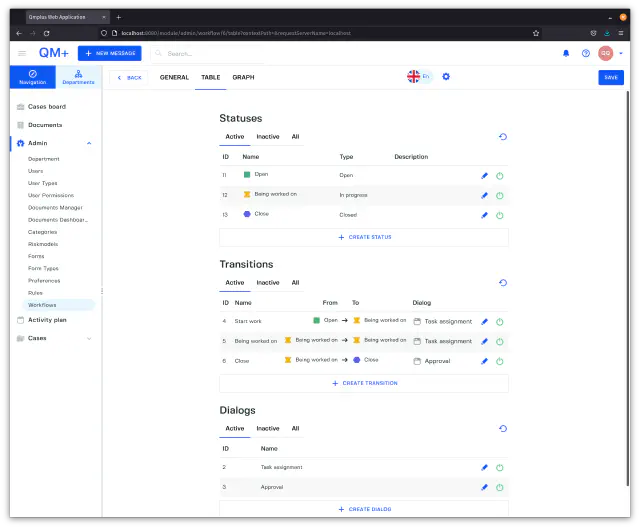
Statuses
Statuses represent states in a process. An example of a state might be New for a new case and `Close for a closed state.
Click on the Create status button to open the New status dialog.
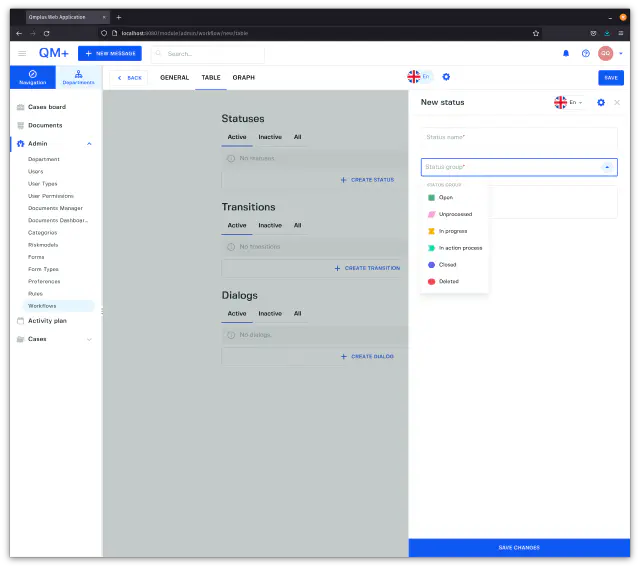
We are going to create three new statuses for our Action workflow.
- Write
Openin theStatus namefield. - Next select the
Opengroup. - Click on the
Save Changesbutton to save the new status.
Next repeat it but this time.
- Write
Being worked onin theStatus namefield. - Next select the
In progressgroup. - Click on the
Save Changesbutton to save the new status.
Finally lets create the close status.
- Write
Closedin theStatus namefield. - Next select the
Closedgroup. - Click on the
Save Changesbutton to save the new status.
So what do the list of groups mean?
| Status Group | Description |
|---|---|
Open | A case is in a newly opened (first time it was opened state). This is basically used to signal a new case starting. |
Unprocessed | A case has been created but not yet opened by any case handler. |
In progress | A case is being worked on. |
In action process | A case triggered an action process and is waiting for it to be resolved. |
Closed | A case has been closed. |
Deleted | A case has been deleted. |
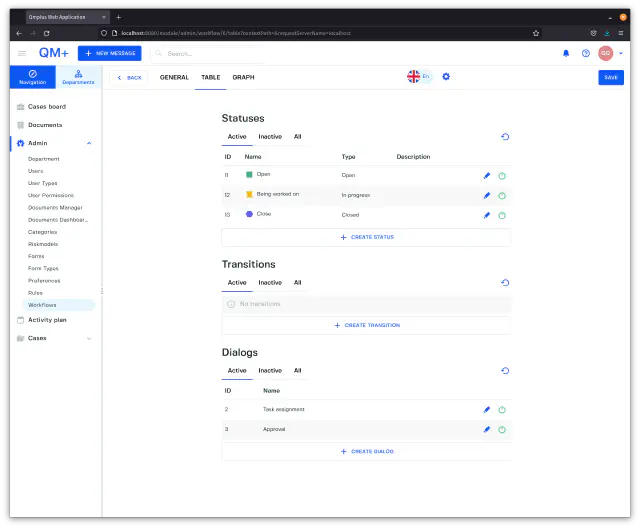
You should now have a view that looks something like.
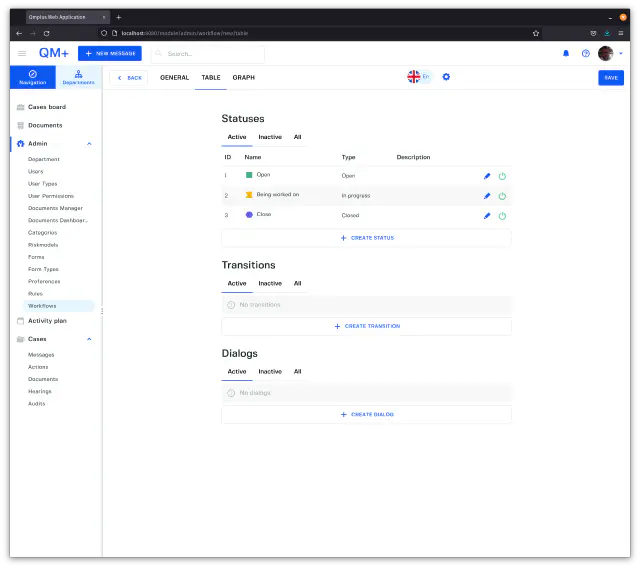
Finally click the Save button in the top right corner to save the whole workflow.
Dialogs
A dialog represents a set of fields configurable by the end user to collect information or trigger actions on a change of status for a case (a transition). Dialog are attached to transitions.
Lets create a dialog to allow us assign tasks and also comment on a case transition.
- Click
Create Dialogbutton to open the new dialog window.
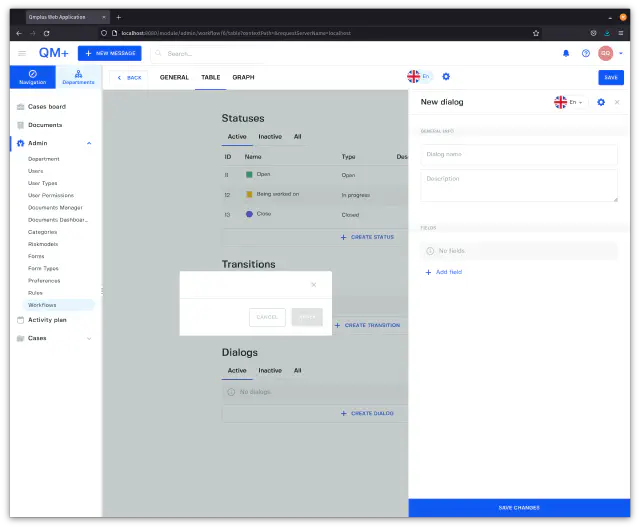
- Set the
Dialog nametoTask assignment.
Next lets look at what kind of fields we can add to the dialog and what they mean.
- Click on the
Add fieldbutton.
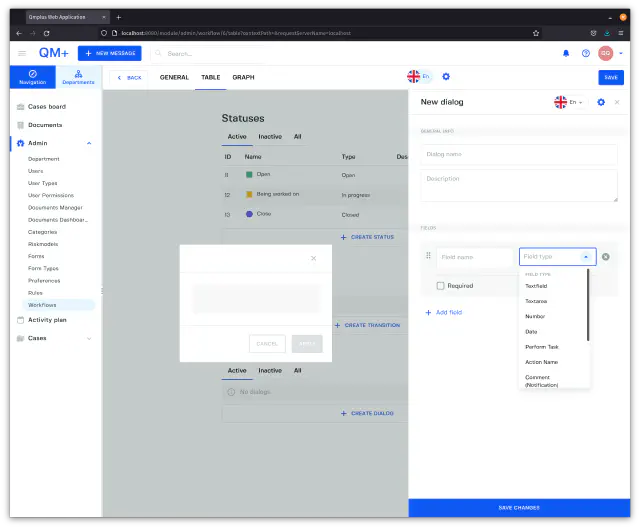
As you can see there is a sizable selection of field types. Lets have a look at each and what they mean before constructing our custom dialog.
| Field Type | Triggers | Description |
|---|---|---|
Textfield | No | A single row free text entry field. |
Textarea | No | A text area with more columns for free text entry. |
Text Editor | A text area with basic formatting for free text entry. | |
Number | No | Entering any numeric value. |
Date | No | Specifiying a date. |
Perform Task | Yes | A field allowing you to specify who performed the task. |
Action Name | Yes | The title field that will be used when creating a new Action entry for a transition going into an In action process group state |
Comment | Yes | Allows the user to comment on the transition between states and set who is getting notified about the comment. |
Acknowledgement | Yes | Lets the user acknowledge that specific users performed their tasks. |
Task Assignment Setup | Yes | Allows the user to create tasks of a specific type when transitioning between statues. One can also control if one wants to collect a Due date, Planned hours and Planned start date. |
Add a field of type
Task Assignmentto theDialog.Due date,Planned start dateandPlanned hours. Set theCase participant typedropdown to the valueCase Participator. Leave the boxRequiredunchecked.Add a field of type
Commentto theDialog. LeaveRequiredunchecked.Click
Save Changesto add the dialog to the workflow.
Next lets create an approval dialog.
- Click
Create Dialogbutton to open the new dialog window. - Set the
Dialog nametoApproval. - Add a field of type
Acknowledgementto theDialog. Leave the boxRequiredunchecked. - Add a field of type
Commentto theDialog. LeaveRequiredunchecked. - Click
Save Changesto add the dialog to the workflow.
Your workflow screen should look something like this now.
Finally click the Save button in the top right corner to save the whole workflow.
Transitions
A transition represents a change between two statuses (As an example you might move a case from Open status to Being worked on status).
A transition can have an optional dialog attached to it to collect information as part of the transition.
When we talk about transitions we will use source as the start status of the transition and target as the end status.
The target status has a Status group that will trigger actions during the transition.
| Status Group | Actions |
|---|---|
Open | When a case is transitioned into the Open group it will possibly trigger notifications to the picked case handler for the case. |
Unprocessed | Might trigger notifications to the target case handler. |
In progress | Usually does not trigger actions. |
In action process | Will trigger the creation of an Action entry with its new workflow and potentially notifications. |
Closed | Might trigger notifications to the target case handler. |
Deleted | Might trigger notifications to the target case handler. |
Lets create a table that shows the transitions we will build.
| From status | To status | Dialog | Description |
|---|---|---|---|
Open | Being worked on | Task assignment | Lets us move a case into the in progress group state. |
Being worked on | Being worked on | Task assignment | Lets us move a case into the in progress group state. |
Being worked on | Closed | Approval | Lets us move a case into the closed status. |
Lets click on the Create Transition button to bring up create transition dialog.
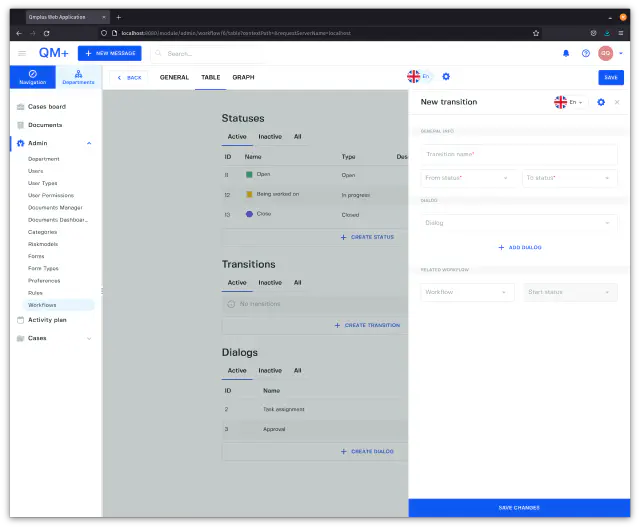
Build Open to Being worked on
- Fill in the
Transition namefield withStart work. - Select the
Openstatus as theFrom statusandBeing worked onas theTo status. - Select the
Task assignmentdialog. - Click the
Save changesbutton.
Being worked on to Being worked on
- Fill in the
Transition namefield withBeing worked on. - Select the
Being worked onstatus as theFrom statusandBeing worked onas theTo status. - Select the
Task assignmentdialog. - Click the
Save changesbutton.
Being worked on to Closed
- Fill in the
Transition namefield withClose. - Select the
Being worked onstatus as theFrom statusandCloseas theTo status. - Select the
Approvaldialog. - Click the
Save changesbutton.
Finally click the Save button in the top right corner to save the whole workflow.
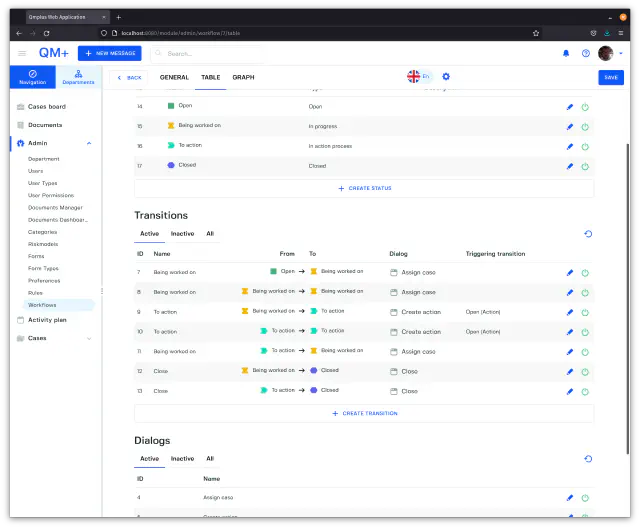
You should now have a workflow that looks like the following.
Finish Action workflow
Finally click on the General tab and set the Start case status pulldown to Open and Close case status to Close. These options signal the start and end points of the workflow.
Finally click the Save button to save the whole workflow.
Graph
Finally we can see a graphical representation of the workflow by clickin on the Graph tab. Clicking on the tab will show you someting looking like.

Message Workflow
Next we are going to build a message workflow. Lets outline what we plan to build and follow the steps mentioned above to build the actual statuses, dialogs and transitions.
- Click
New workflow. - In the
Workflow titleenterMessage - For the
Entity typedropdown pick theMessageentity type.
Statuses
We are going to create the following statuses.
| Name | Group type | Description |
|---|---|---|
Open | Open | The initial state for a new case. |
Being worked on | In progress | The case is being worked on. |
To action | In action process | The action resulting from the message is being worked on. |
Closed | Closed | We finished working on the message. |
Dialogs
We are going to build the following dialogs.
Assign case
Next lets create an approval dialog.
- Click
Create Dialogbutton to open the new dialog window. - Set the
Dialog nametoAssign case. - Add a field of type
Task Assignmentto theDialog. Leave the boxRequiredunchecked. - Add a field of type
Commentto theDialog. LeaveRequiredunchecked. - Click
Save Changesto add the dialog to the workflow.
Create action
Next lets create an create action dialog.
- Click
Create Dialogbutton to open the new dialog window. - Set the
Dialog nametoCreate action. - Add a field of type
Action Nameto theDialog. Leave the boxRequiredchecked. - Add a field of type
Task assignmentto theDialog. LeaveRequiredunchecked. - Add a field of type
Commentto theDialog. LeaveRequiredunchecked. - Click
Save Changesto add the dialog to the workflow.
Close
Next lets create an create action dialog.
- Click
Create Dialogbutton to open the new dialog window. - Set the
Dialog nametoClose. - Add a field of type
Acknowlegementto theDialog. LeaveRequiredchecked. - Add a field of type
Commentto theDialog. LeaveRequiredunchecked. - Click
Save Changesto add the dialog to the workflow.
At the end your workflow should looking something like.

Transitions
We will add the following transitions to our workflow.
| Name | From status | To status | Dialog | Description |
|---|---|---|---|---|
| Open | Open | Being worked on | Assign case | Lets us move a case into the in progress group state. |
| Being worked on | Being worked on | Being worked on | Assign case | Lets us move a case into the in progress group state. |
| To action | Being worked on | To action | Create action | Lets us move a case into the closed status. |
| To action | To action | To action | Create action | Lets us create more actions from a given message. |
| Being worked on | To action | Being worked on | Assign case | Move the message back into Being worked on. |
| Close | Being worked on | Closed | Close | Close the message case. |
| Close | To action | Closed | Close | Close the message case. |