Administrator/Forms
A user guide for working with forms. We cover how to create and modify forms.
This section deals with managing forms in the system. Access the list of forms by clicking on Administrator/Forms.
Forms Listing
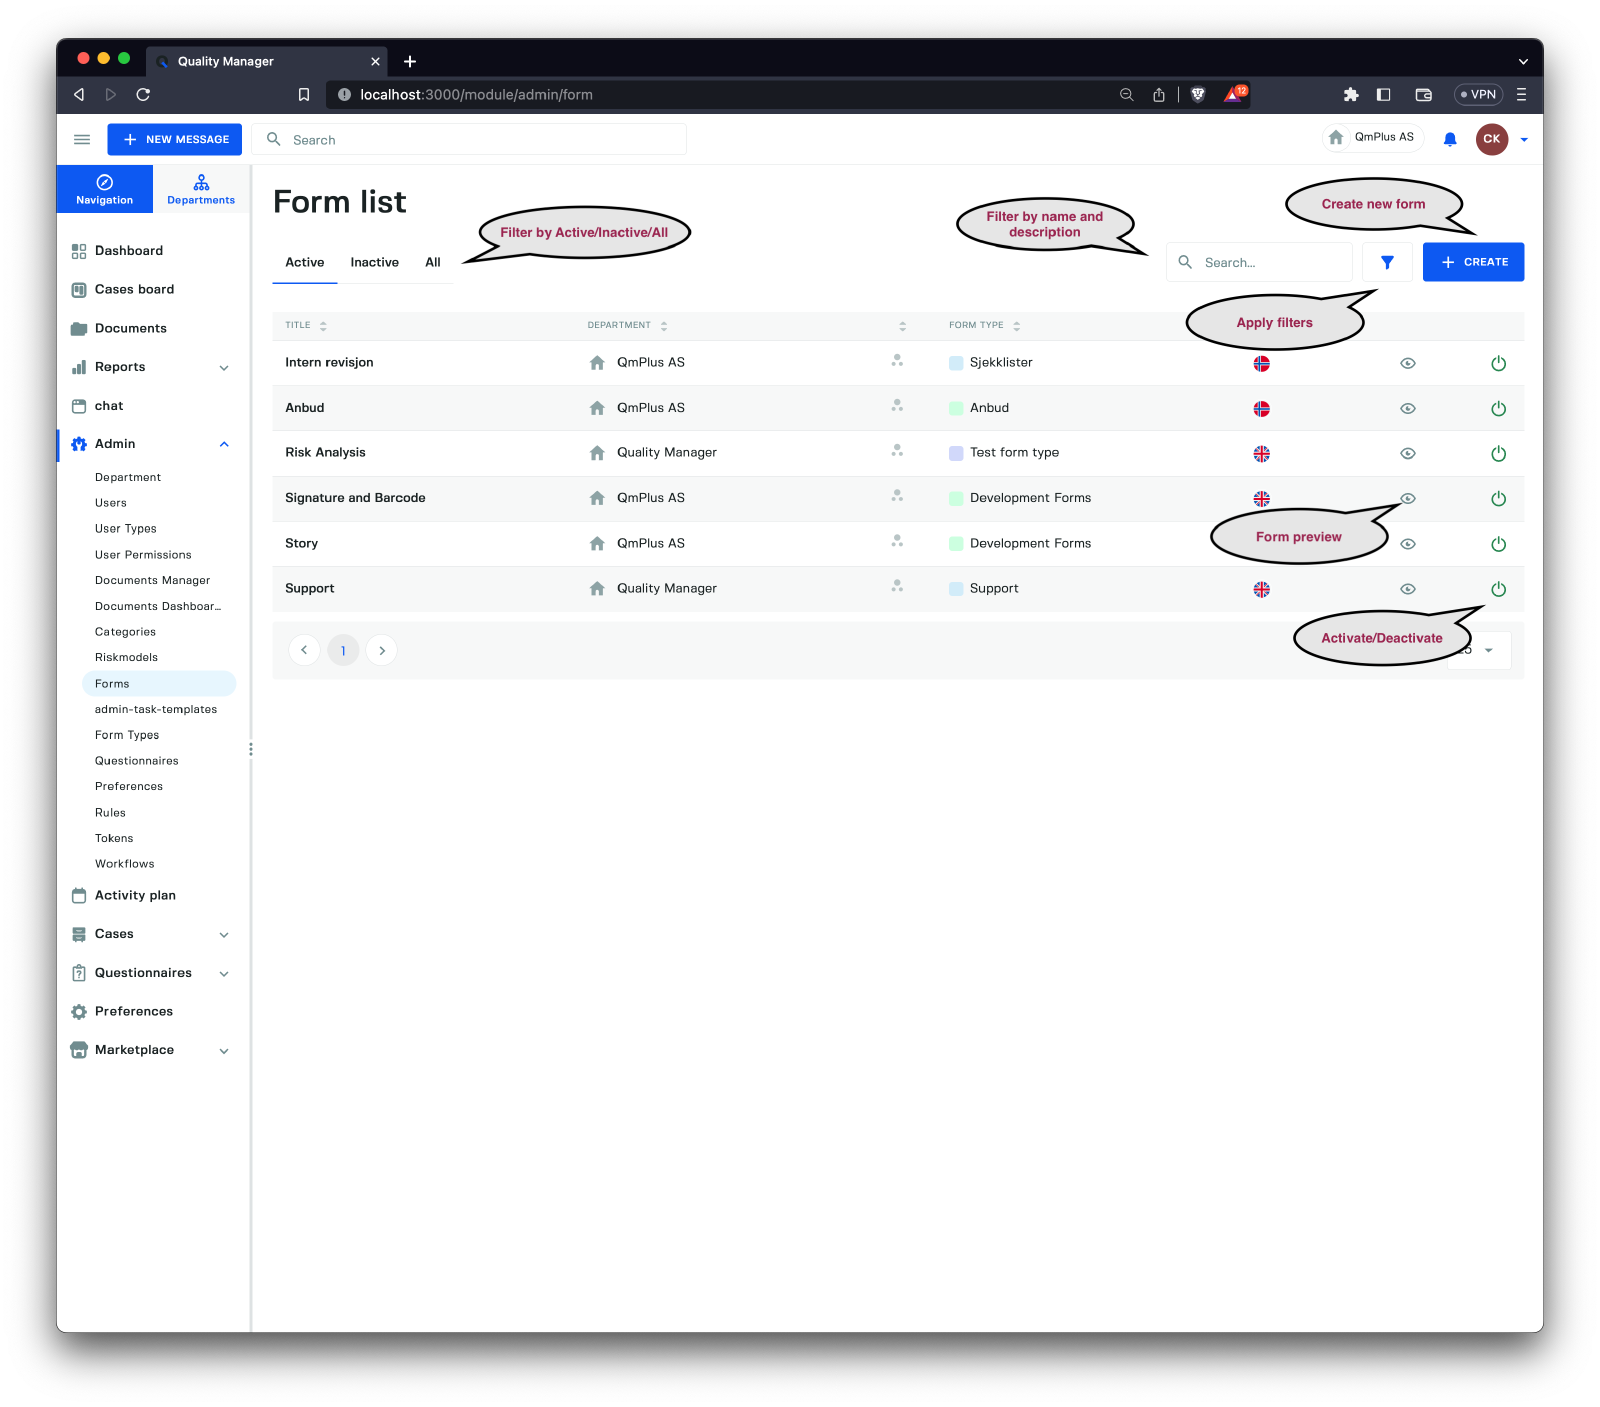
The Forms Listing displays all forms registered in the system. You can filter by Active, Inactive, and All forms, as well as search by text. For more filtering options, click the apply filter button to access the sidebar.
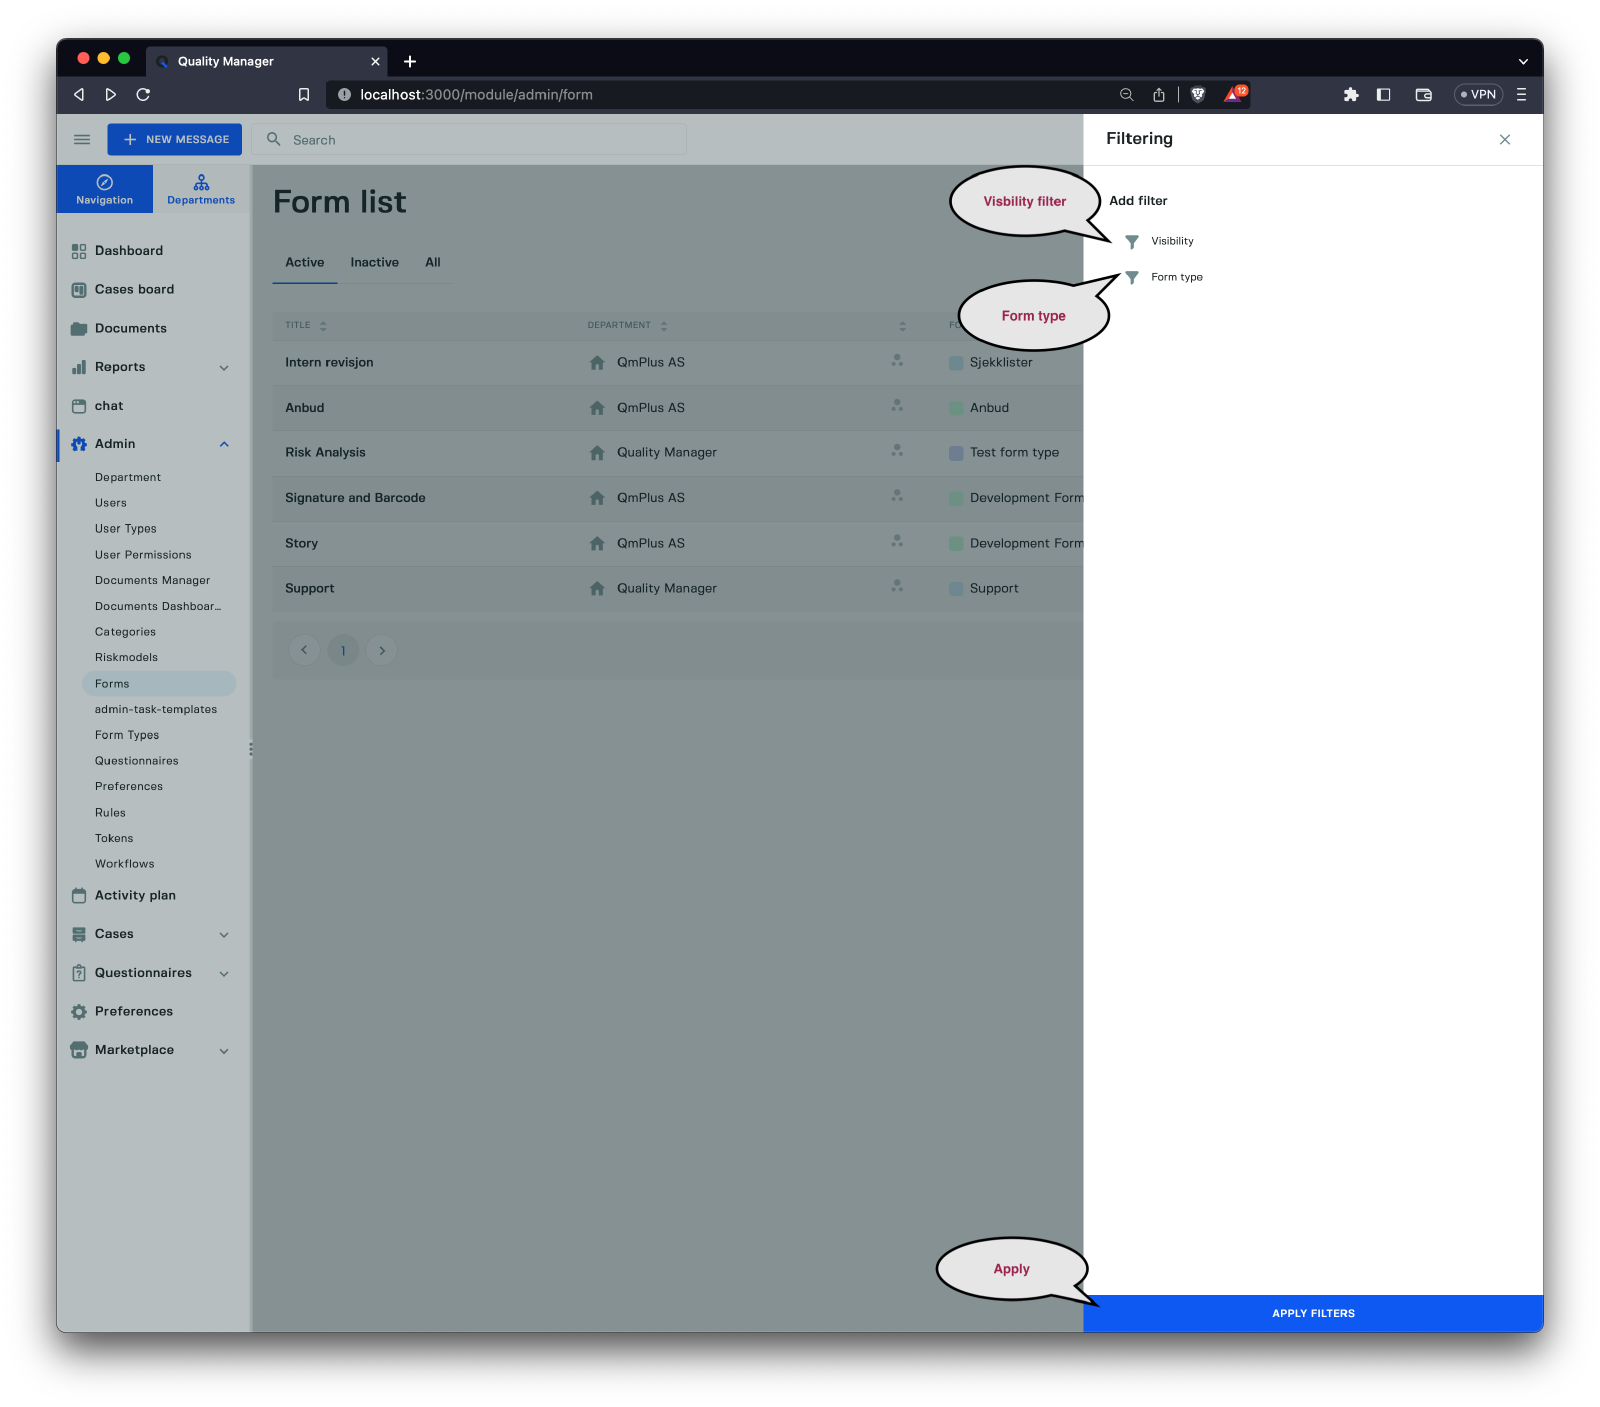
The following filters are available for the forms listing:
| Filter | Description |
|---|---|
Visibility | Filter by the form’s visibility type (Department, Department and children, etc.) |
Form type | Filter the forms by form type. |
Creating a New Form
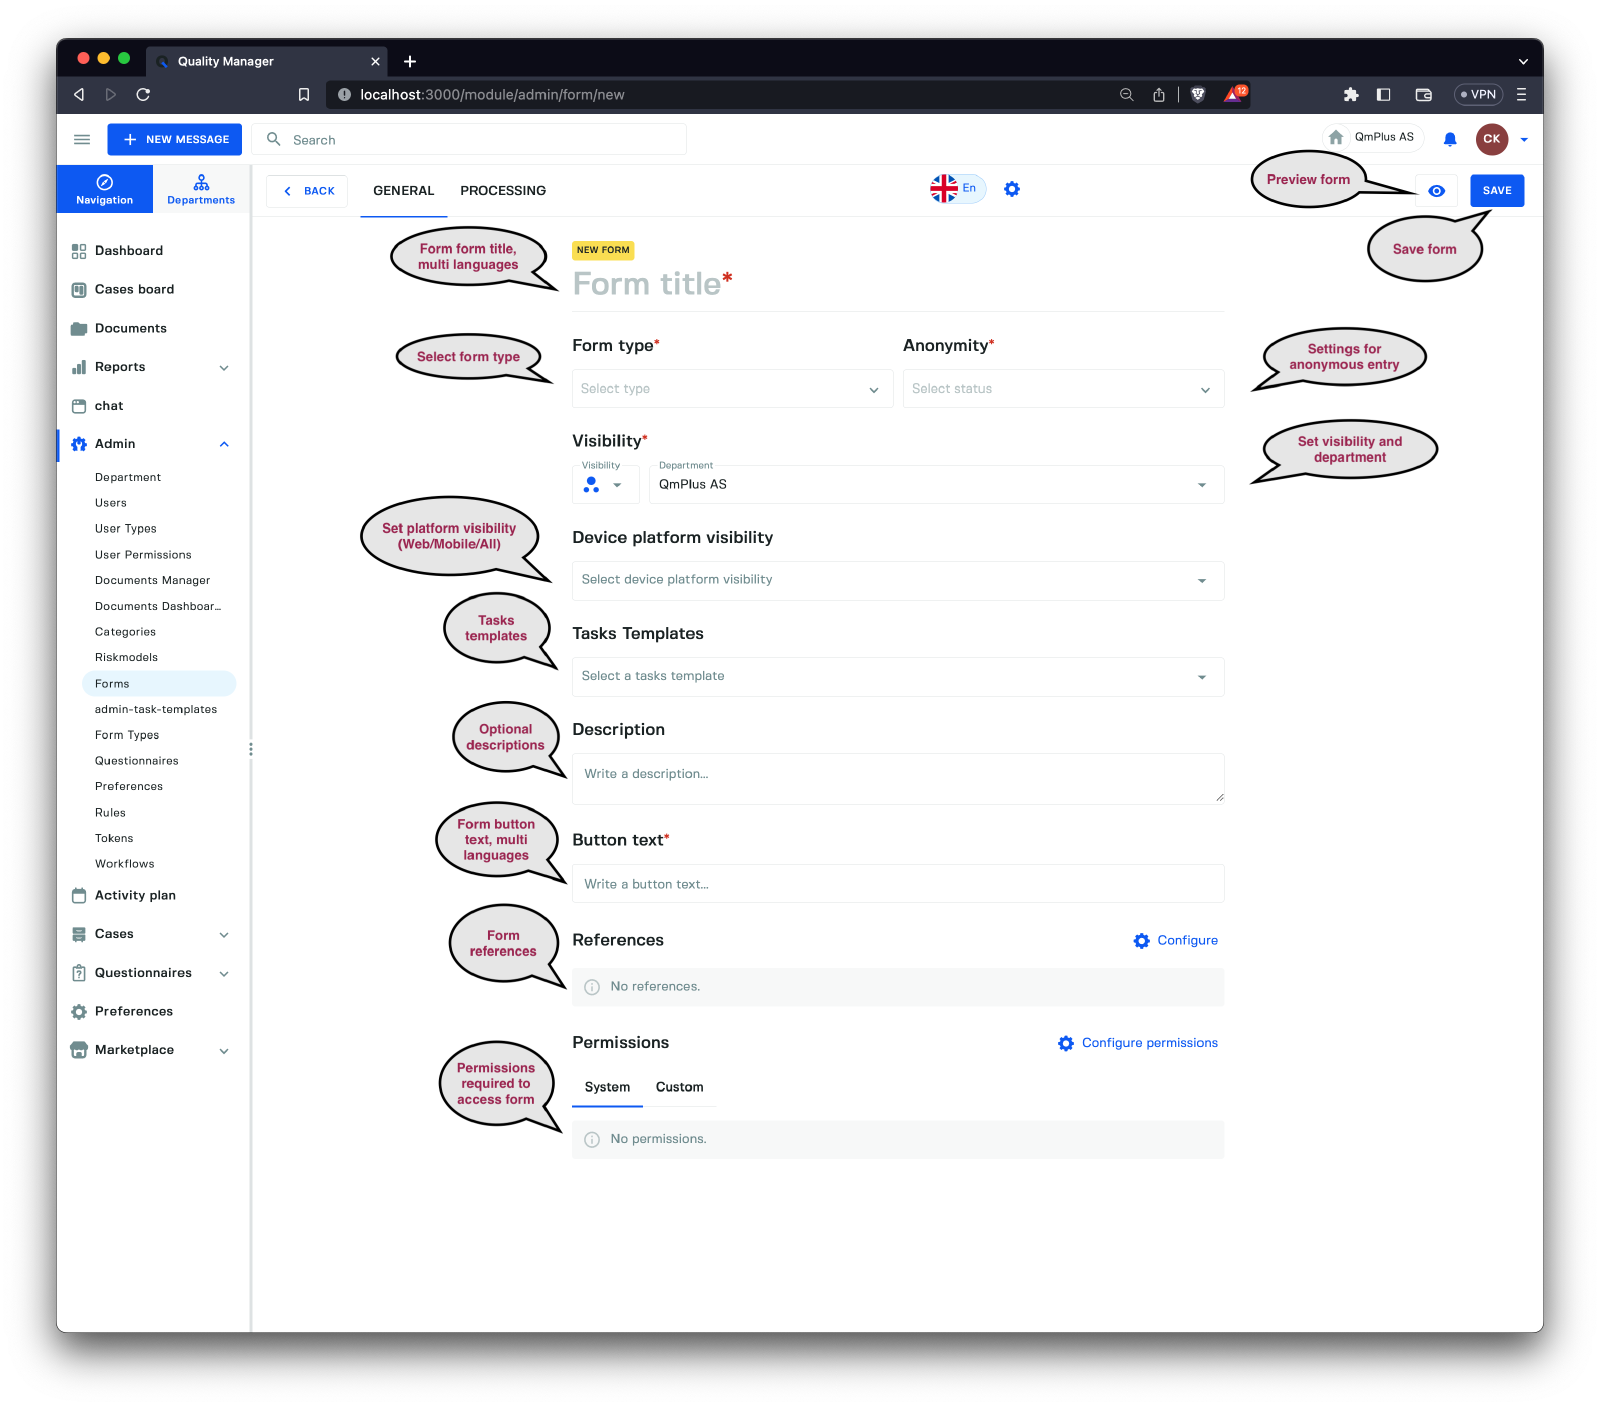
To create a new form, provide the following information:
| Field | Required | Description |
|---|---|---|
Form title | X | The title of the form, supports multiple languages. |
Form type | X | Select one of the Form Types from the system. |
Anonymity | X | Select if the form supports anonymous entry of data. |
Visibility | X | Set the visibility for the form. |
Department | X | Set the department where the form is visible. |
Device platform visibility | Allow selecting the platforms the form is available on (Web, Mobile, All); no selection defaults to All. | |
Tasks Templates | Select an optional Tasks Template that will create a set of tasks on a case when a new form registration occurs. | |
Description | A long text description for the form, supports multiple languages. | |
Button text | The text shown in the register form menu, supports multiple languages. | |
References | Add document references to the form from your document library. | |
Permissions | Restrict the form based on system or custom permissions. |
After specifying the required fields and any additional information, you can create the form and make it available for use within the system.
Building a Form
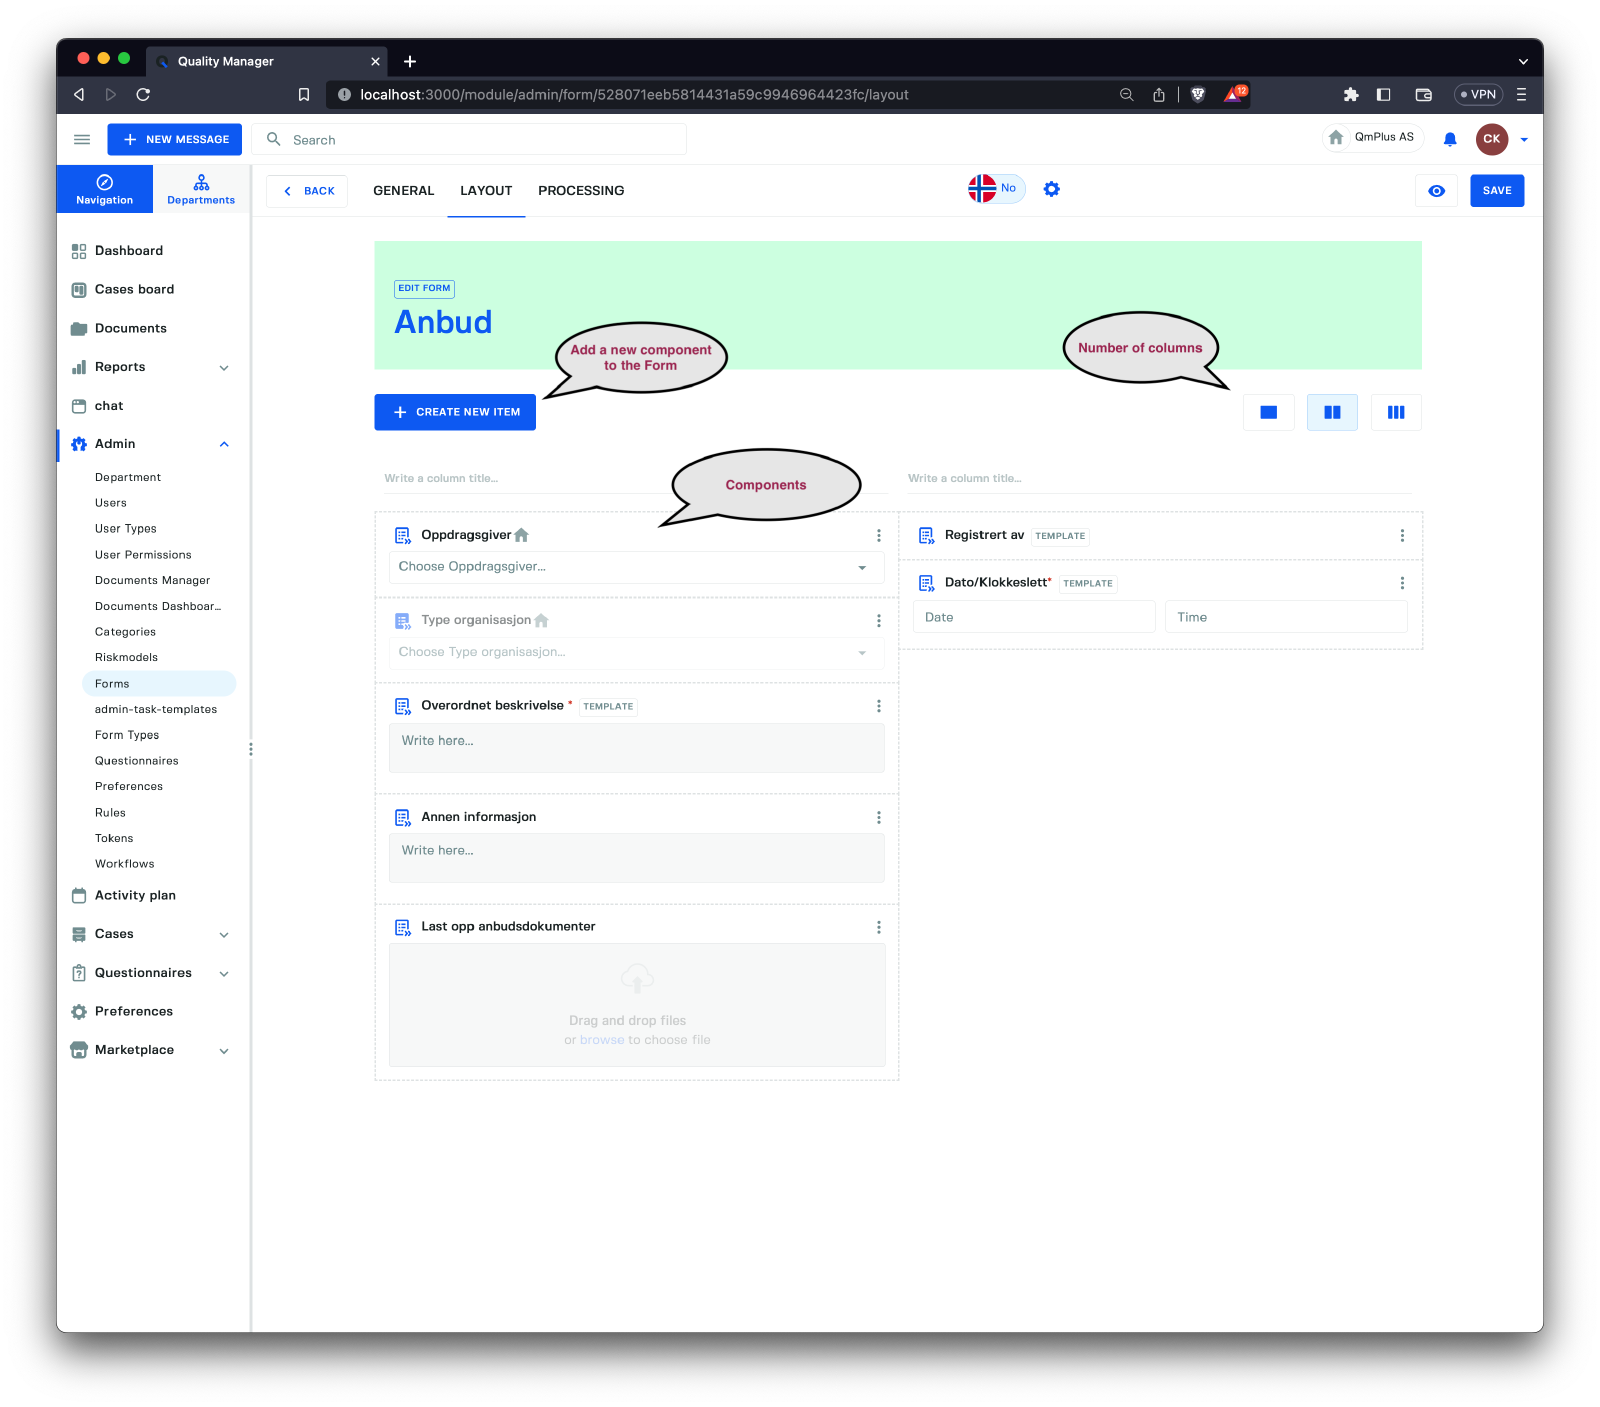
The Layout Tab allows you to start building the Form using various components. Click Create New Item to access a pop-up menu listing the available components.
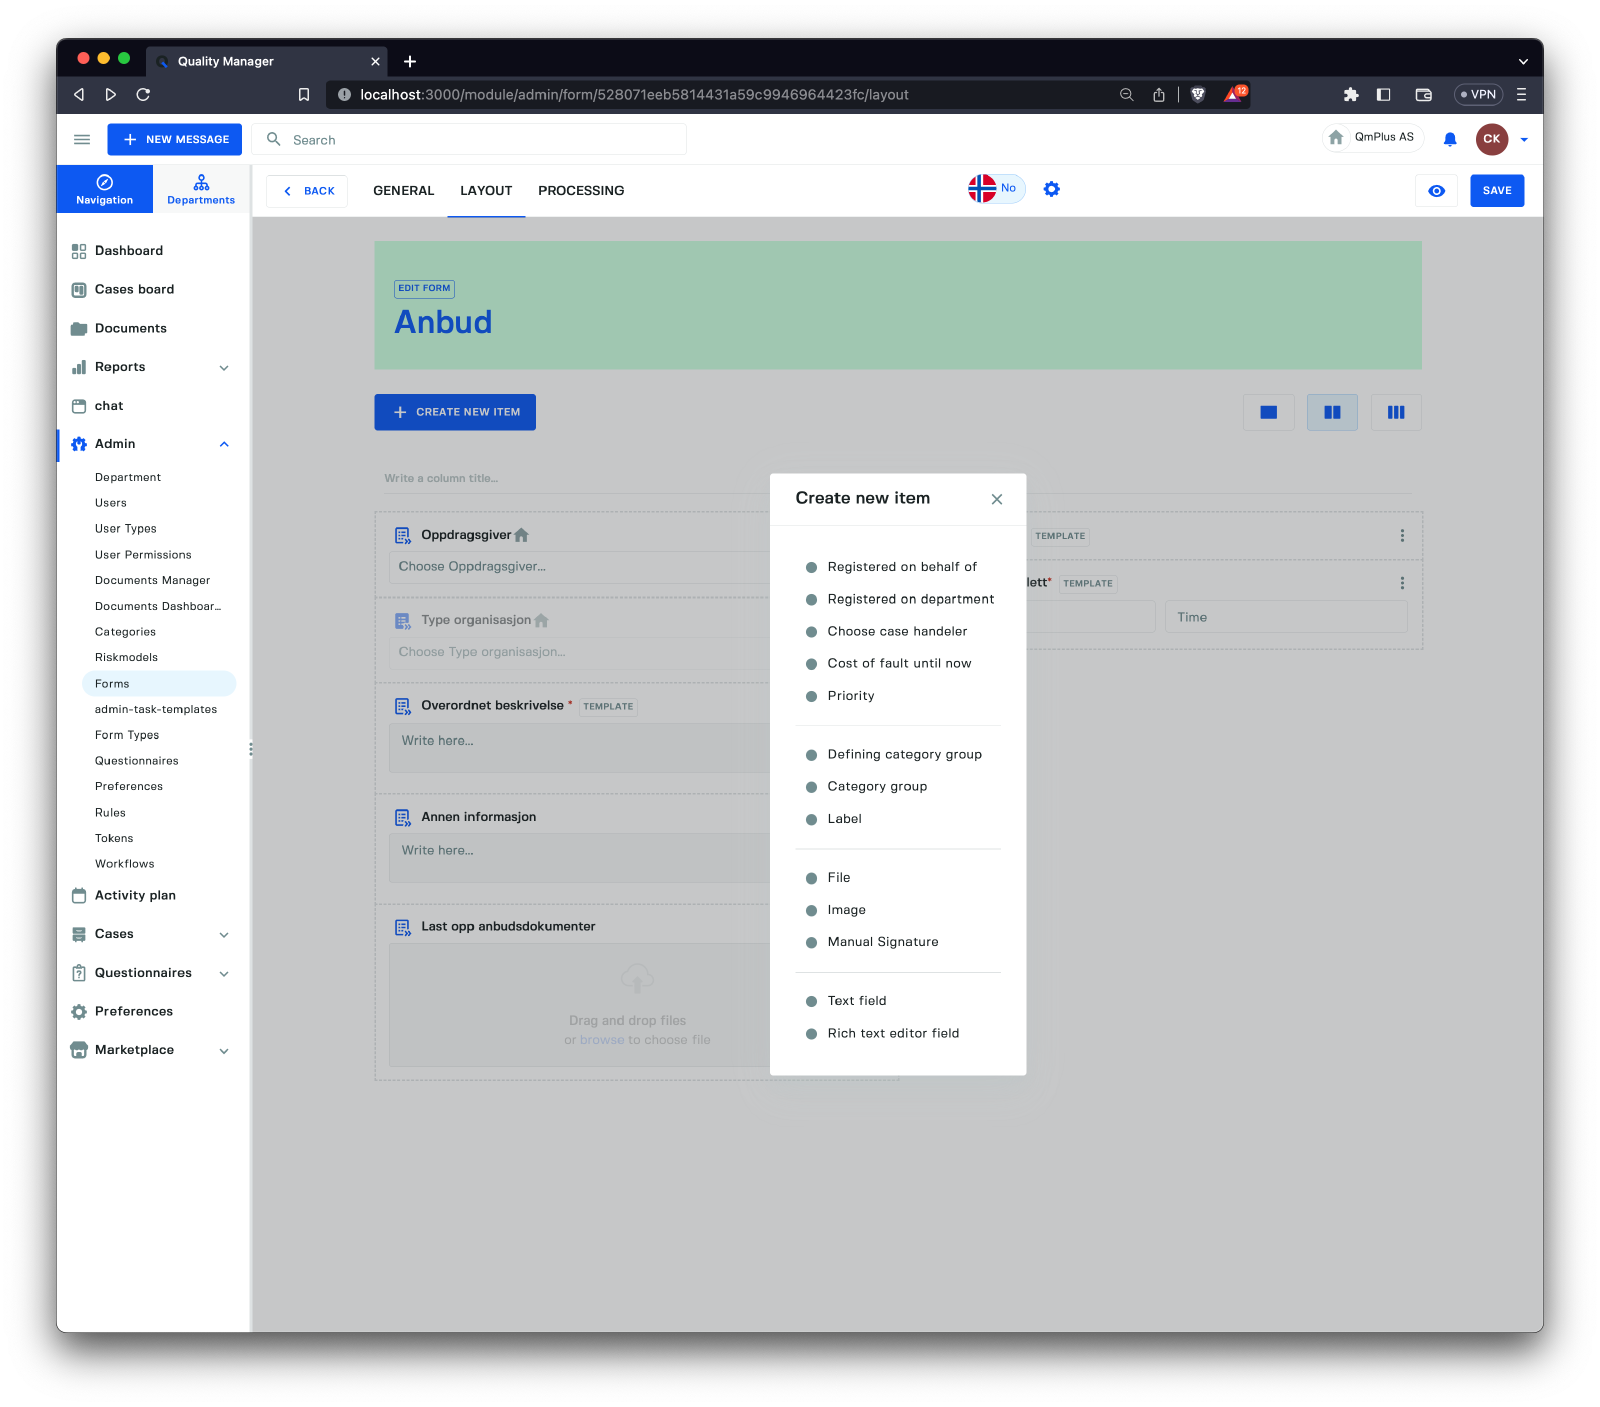
The components you can add to the form are:
| Component | Description |
|---|---|
Registered by | Shows the person who registered the form entry. |
Date/Time | Add a field to record a date and time combination. |
Registered on behalf of | Allows the person entering the form to specify who they are entering the registration on behalf of. |
Registered on department | On what department should the form entry be registered. |
Choose case handler | Lets the person entering the form choose a case handler directly routing it to a person to work on. |
Describe the circumstances/deviation here | Text description used to describe the circumstances or deviation. |
Cost of fault until now | The estimated cost in monetary value until now. |
Priority | Allows the user to specify a priority for the form entry. |
Defining category group | Adds a defining category group to the form. |
Category group | Adds a normal category group to the form. |
Label | A text label to add structure to the form. |
File | A file upload component, allowing the end user to upload a file. |
Image | Add an image to the form. For example, a diagram of instructions. |
Manual Signature | A field that accepts manual signatures. |
Text field | A one-line text field. |
Rich text editor field | A rich text editor field. |
A form can have a single, double, or triple column layout.
For mobile-only forms, we recommend a single column, but the mobile client also supports changing columns.
Configuring a Category Component
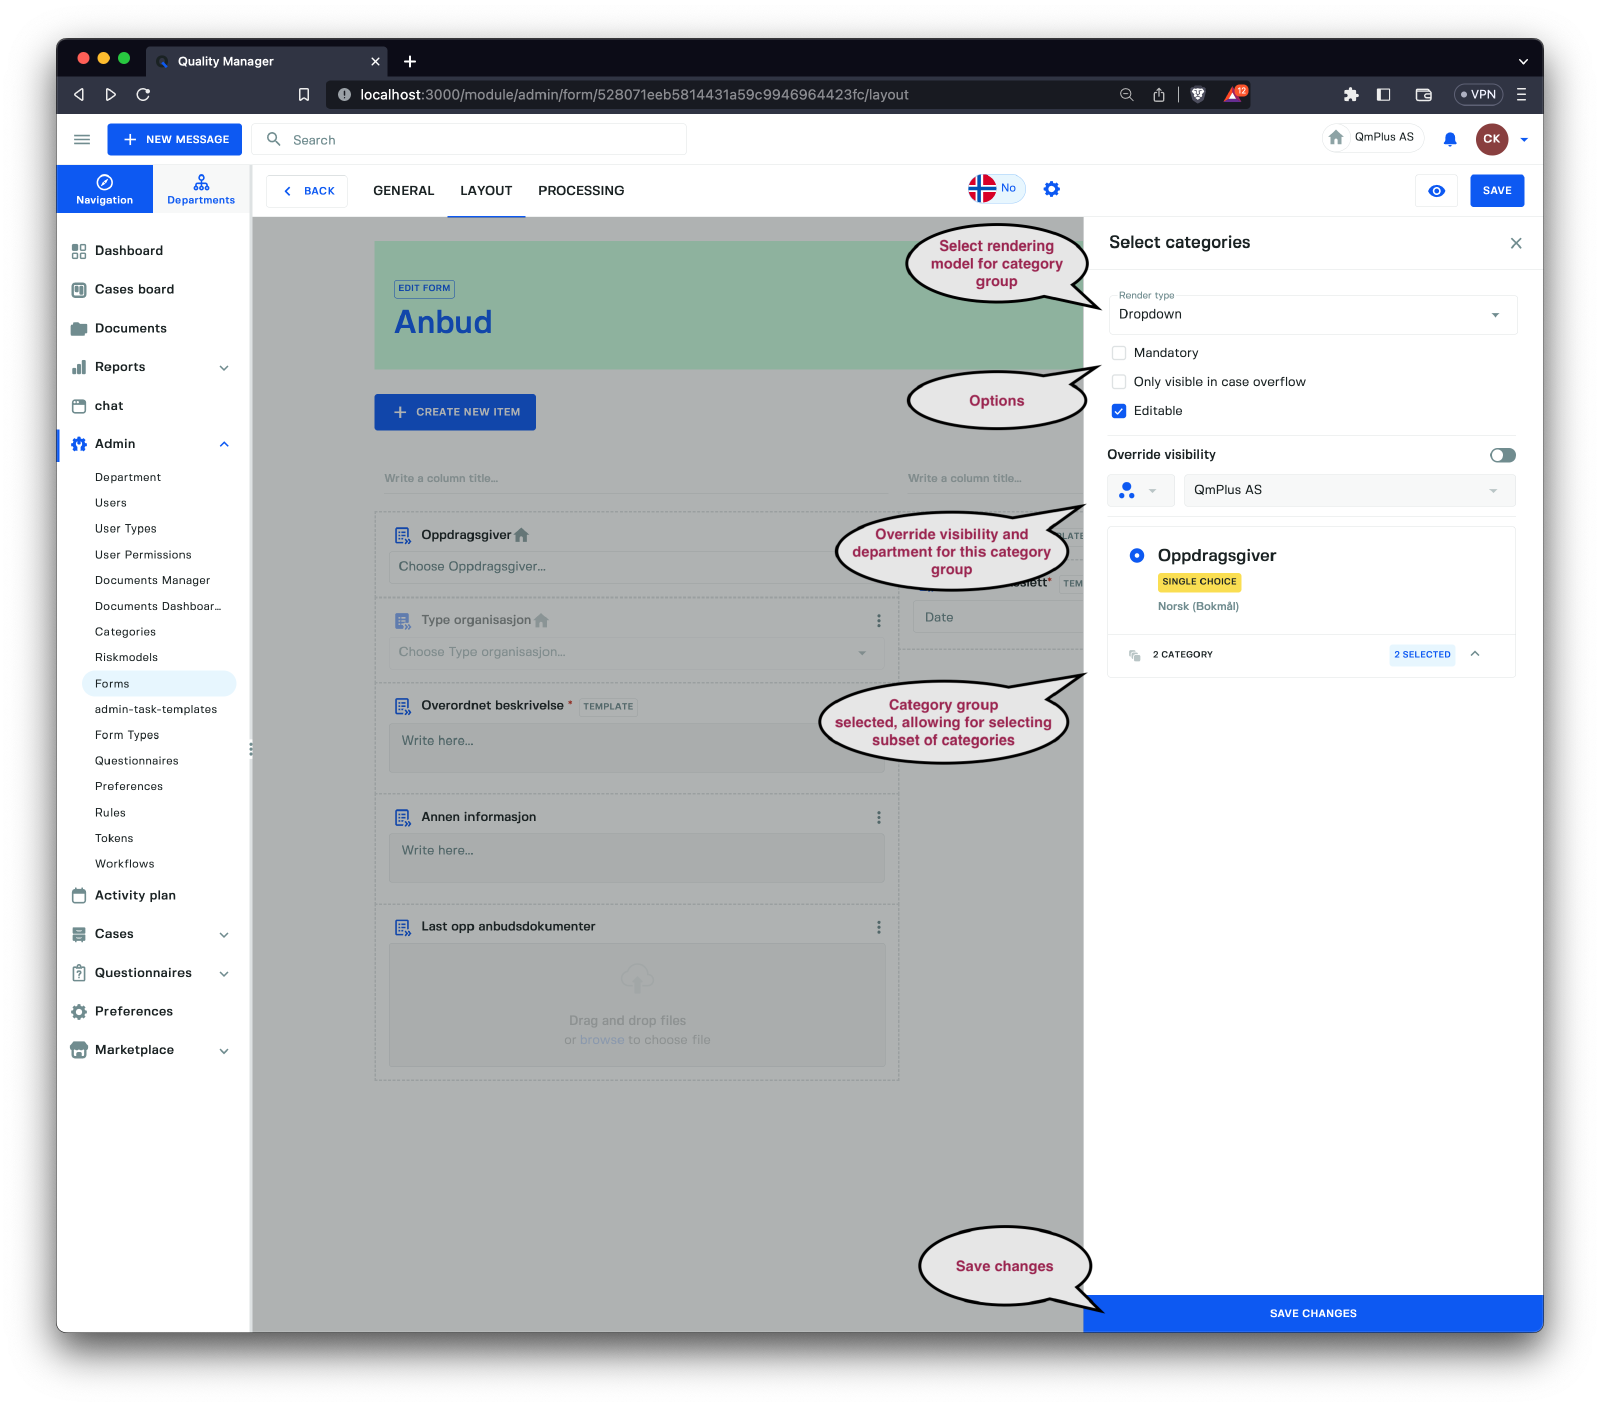
A category group offers several configuration options:
| Options | Description |
|---|---|
Render type | How to render the category group. |
Mandatory | Is the category group mandatory. |
Only visible in case overflow | Only visible for case handlers. Not visible for the person entering a form. |
Visible on mobile | Is visible on mobile. |
Override visibility | Override the form’s visibility for this category group only. For example, if you want to show a category group only for a sub-department. |
Visibility | Set the override visibility. |
Department | Set the override department. |
Category group | The category group allows the designer to select a subset of categories to display in the form. |
Customize the form by adding and configuring components to meet your needs, ensuring that it captures all the required information for your specific use case.
The available render types for category components are:
| Options | Description |
|---|---|
Auto | Automatically selects the most appropriate component depending on the number of categories. If there are many categories, it will switch to a dropdown menu. |
Dropdown | A dropdown menu of categories. |
Radio buttons | Radio buttons for single-select categories. |
Check boxes | Check boxes for multi-select category groups. |
Configuring a Text Element
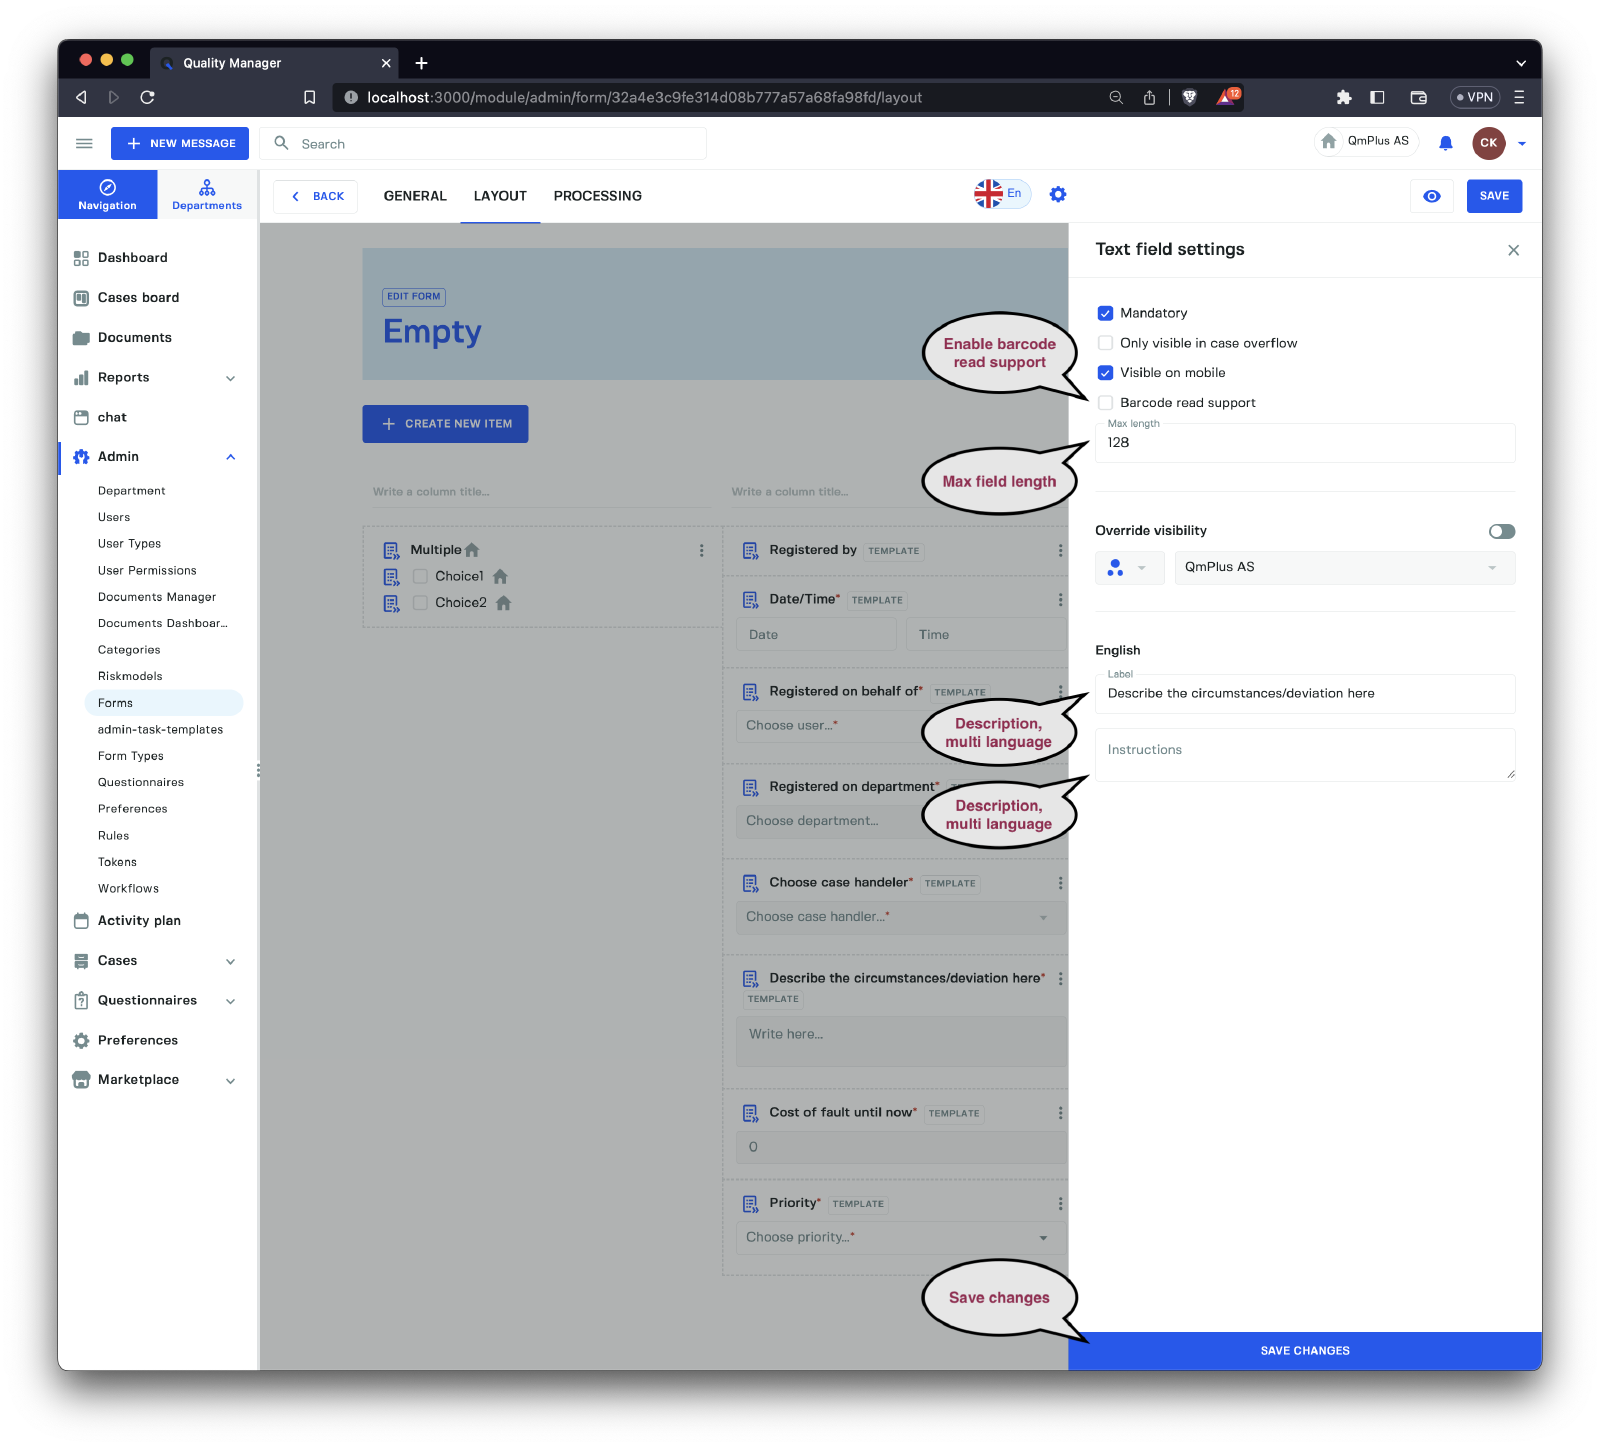
A text element has several configuration options:
| Options | Description |
|---|---|
Mandatory | Determines if the category group is mandatory. |
Only visible in case overflow | Only visible for case handlers, not visible for the person entering a form. |
Visible on mobile | Indicates if the element is visible on mobile devices. |
Barcode read support | Enables barcode scanning support for the field. |
Max length | Sets the maximum length of the text field. |
Override visibility | Overrides the form’s visibility for this category group only, useful if you want to show a category group only for a sub-department. |
Visibility | Sets the override visibility. |
Department | Sets the override department. |
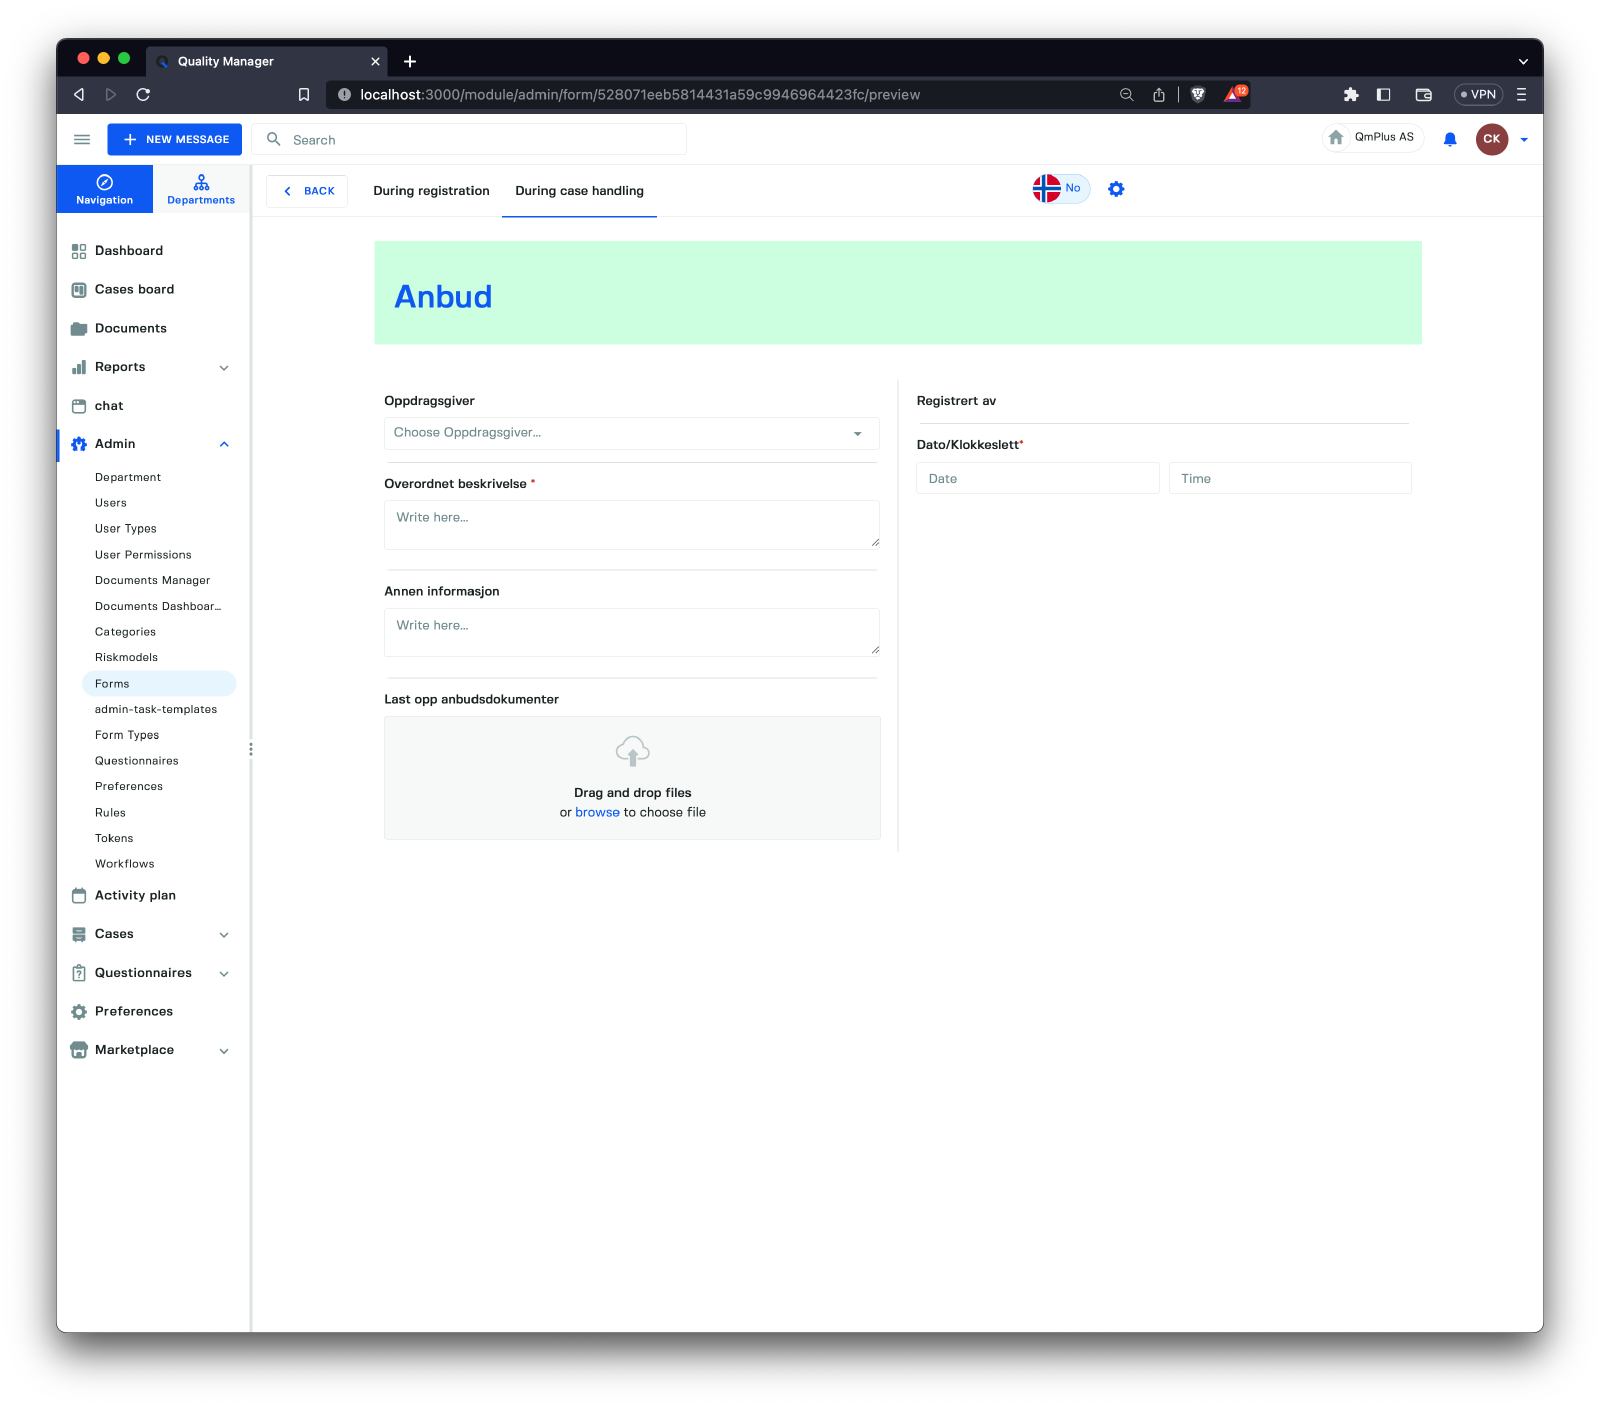
Form Preview

The Form Preview feature allows you to test how the form behaves.
| Mode | Description |
|---|---|
During registration | Displays the form as it appears to the user entering the form. |
During case handling | Displays the form as it appears to a case handler after opening the registered form entry. |
To see how the form will render in different departments, click on the department at the top right corner and change the department.
Processing Settings
The Processing tab contains settings to set default case deadlines and escalations for this particular form. If set, these settings will override any specifications at the workflow level.
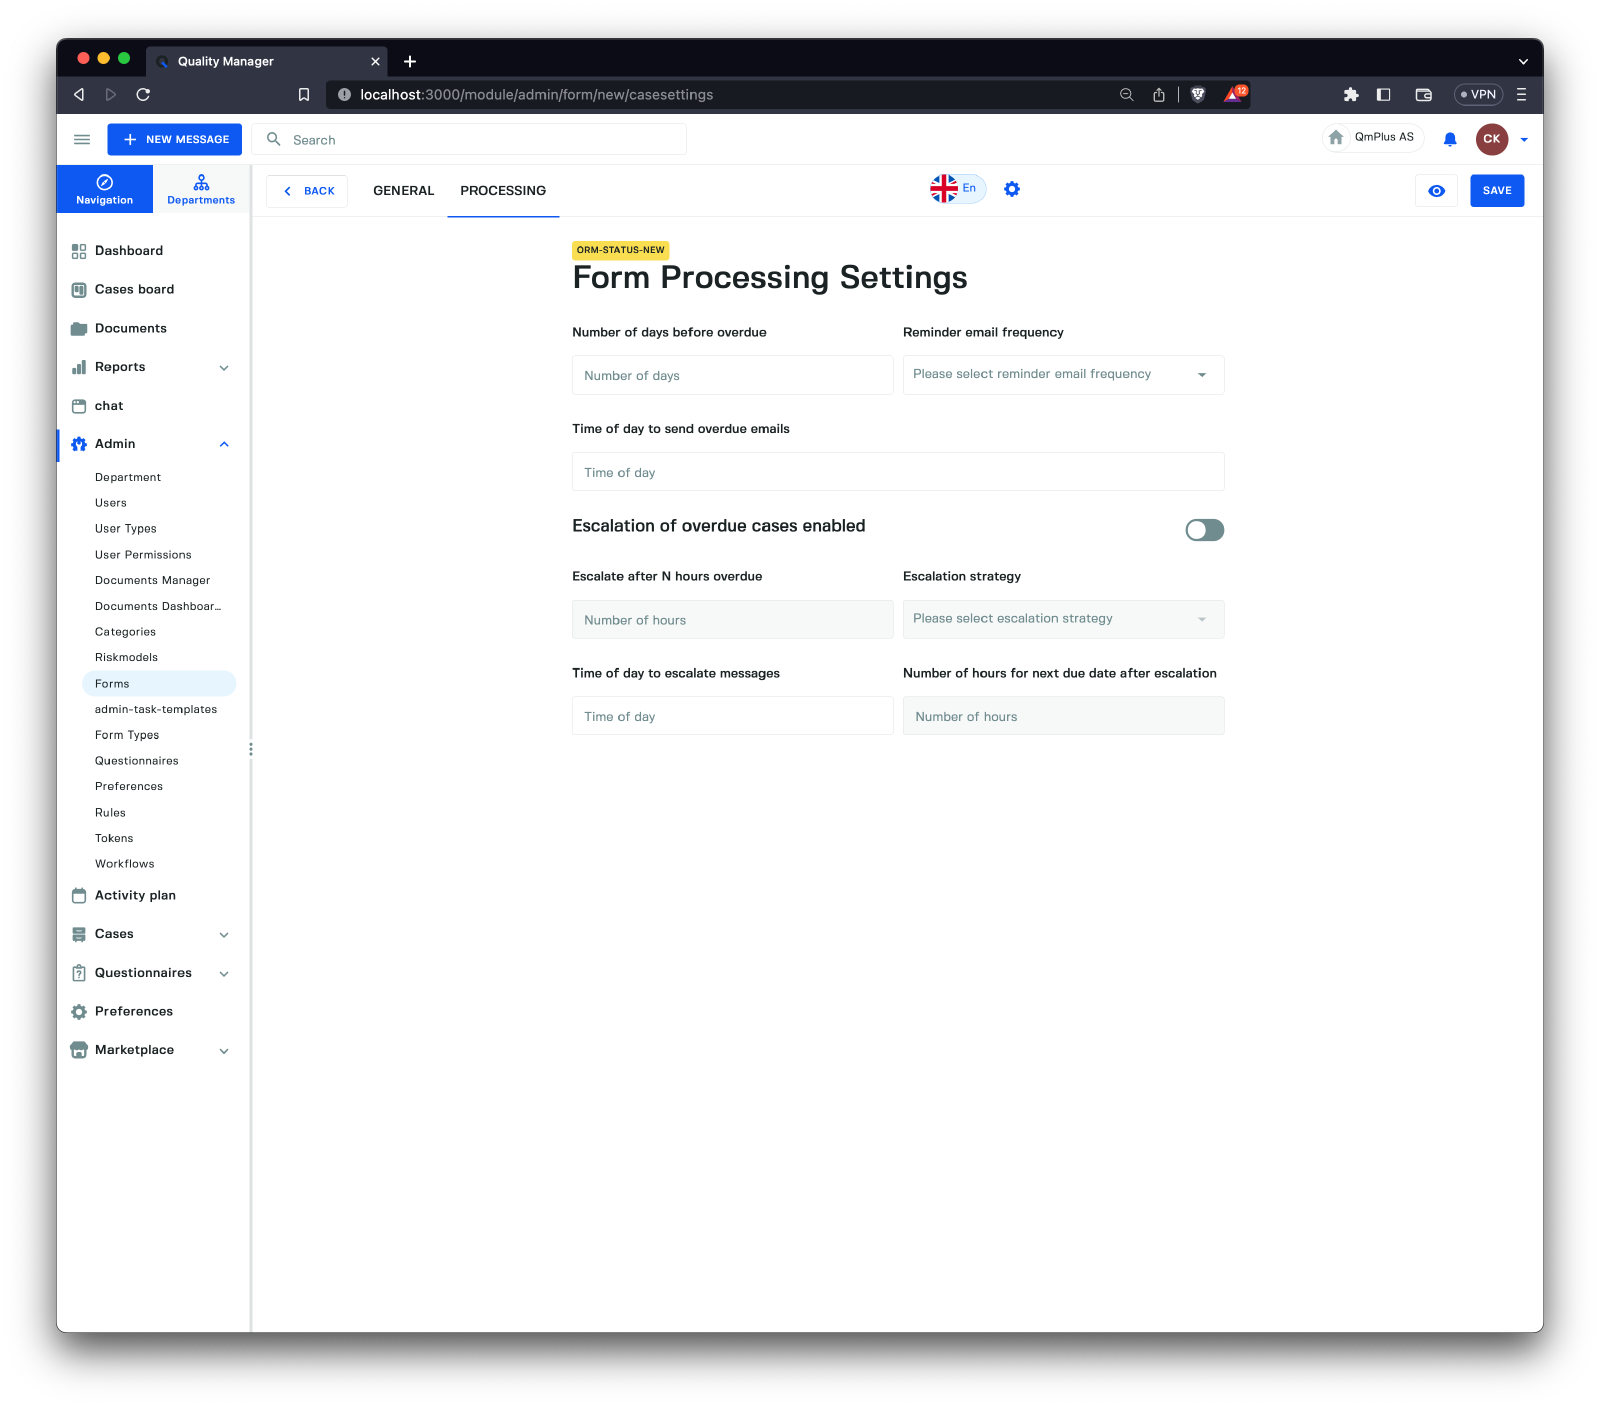
Due Dates
This feature allows you to control how due date notifications are handled. It enables you to set general due date handling settings for a workflow, which will apply to all forms using that workflow.
Formsallow you to override these settings. For example, you can have anAccidentform with much shorter automatic due dates compared to the general workflow.Formsettings will override the workflow settings.
The available fields are:
| Field | Description |
|---|---|
Number of days before overdue | The number of days since the last update to a case before it’s considered overdue. |
Reminder email frequency | The frequency of sending overdue email notifications, with options like Off, Every day, Every Monday, etc. |
Time of day to send overdue emails | Specifies the time of day to send the email. For example, you might want overdue notices to be delivered after 9 in the morning. This is not an exact time; the email will be sent sometime after the specified time, depending on your email system and sending time. |
Escalation
This feature allows you to control how escalations are handled. It enables you to set general escalation handling settings for a workflow, which will apply to all forms using that workflow.
Formsallow you to override these settings. For example, you can have anAccidentform with much shorter automatic escalation times compared to the general workflow.Formsettings will override the workflow settings.
The available fields are:
| Field | Description |
|---|---|
Escalation of overdue cases enabled | Enables or disables the escalation feature. |
Escalate after N hours overdue | The number of hours since the last case update before it’s considered for escalation. |
Escalation strategy | The strategy used to determine to whom the case should be escalated. See available strategies below. |
Time of day to escalate messages | The time of day when messages should be escalated. |
Number of hours for next due date after escalation | The next due date after escalating the case to a new case handler. |
The available strategies are:
| Strategy | Description |
|---|---|
Direct supervisor | The case will be sent to the person’s closest direct supervisor with permission to process cases. If there are multiple potential supervisors, one of them will be chosen at random. |