Administrator/Workflows
A user guide for working with workflows. We cover how to create and modify workflows.
This section is about managing workflows within the system.
By clicking on Administrator/Workflows, you gain access to the list of workflows.
Workflows List
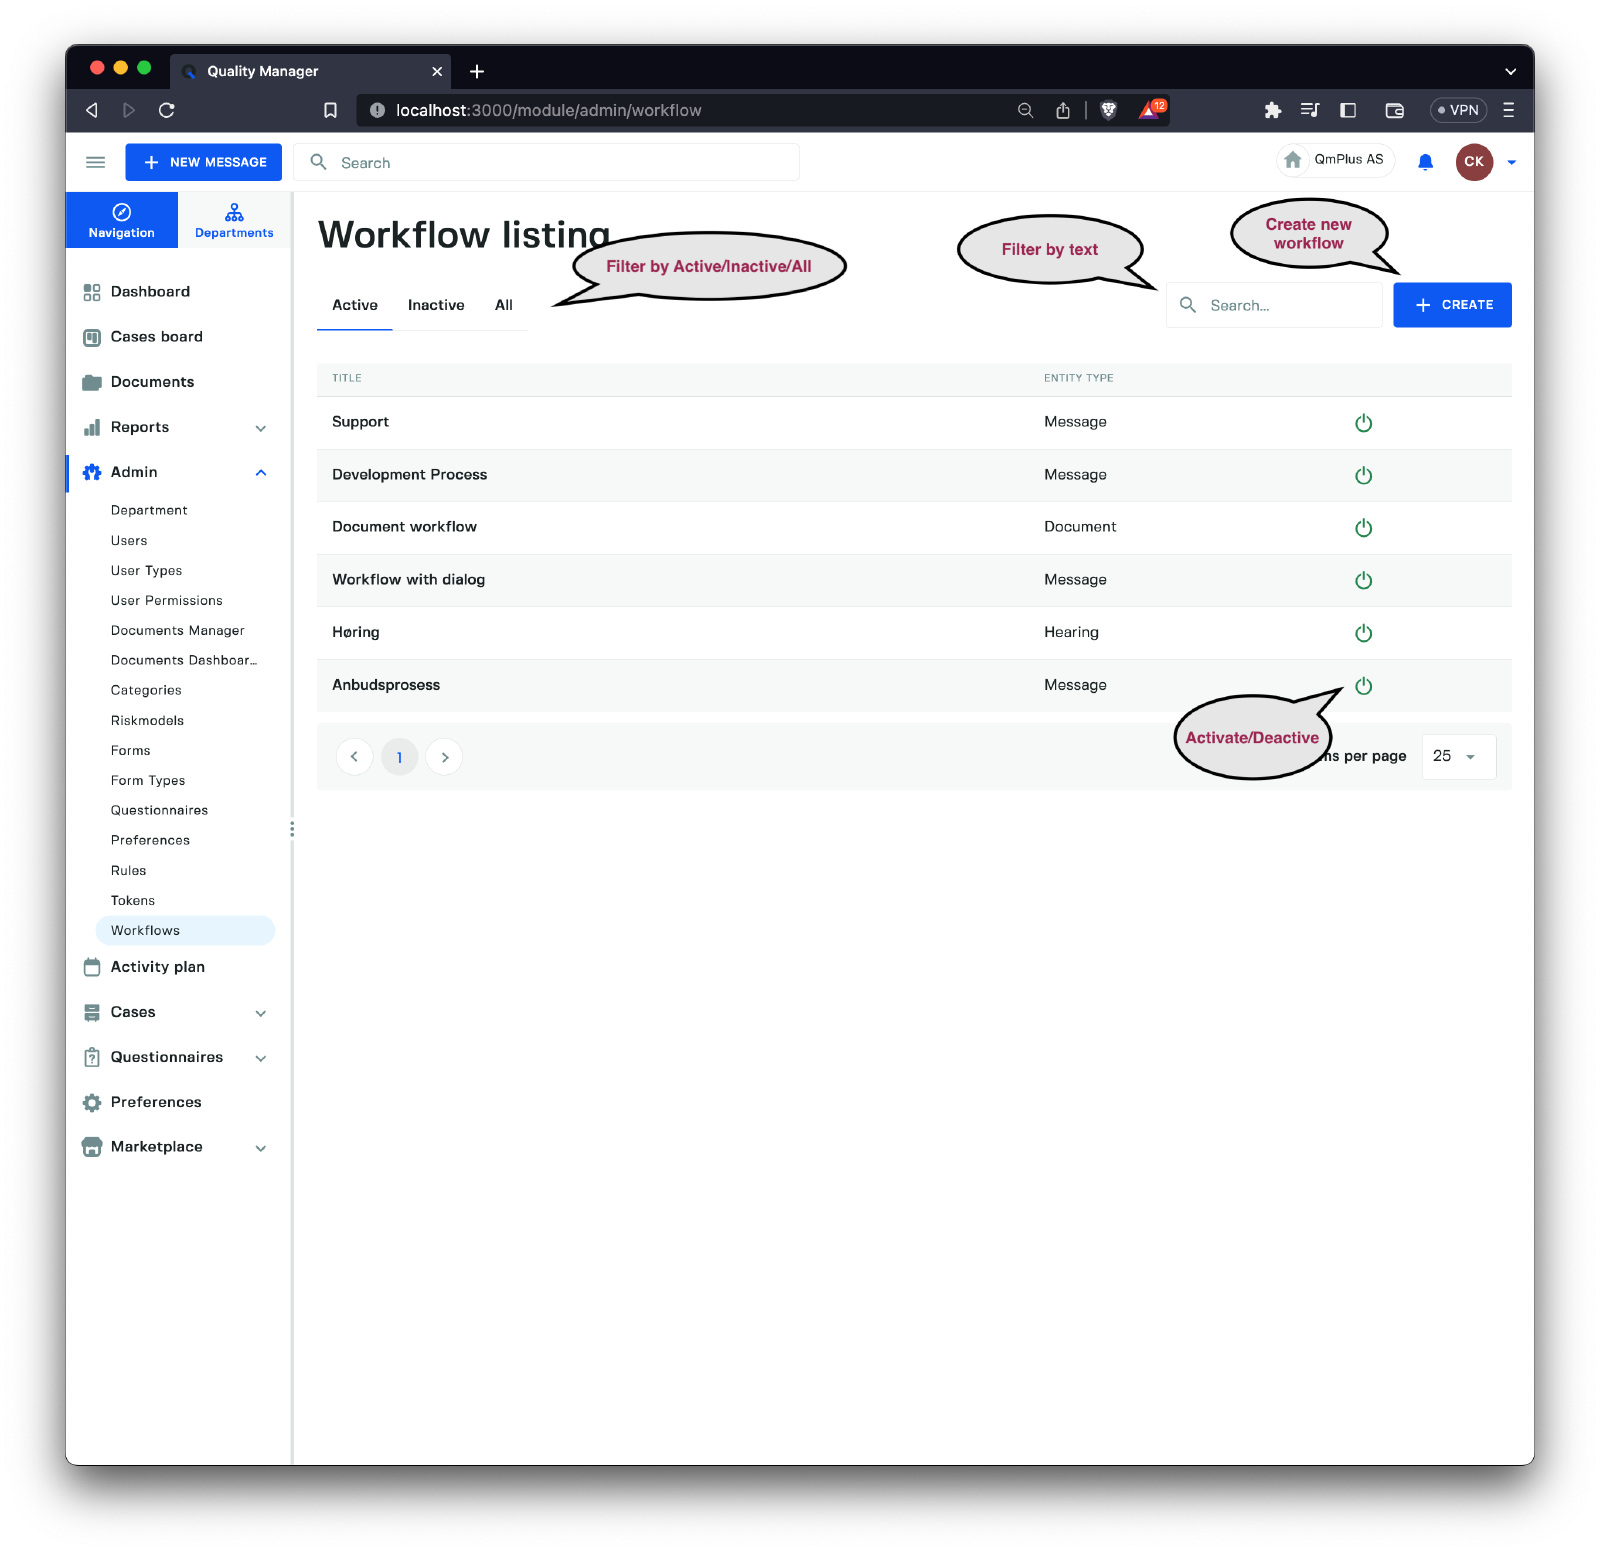
The Workflows list overview allows you to see all workflows defined in the system. Workflows are global and shared by all departments within the organization.
Workflows can be activated and deactivated as needed. This does not affect existing form types that use the workflow but makes it impossible to create new form types for that specific workflow.
Create Workflow
There are four tabs to consider when creating a new workflow.
| Tab | Description |
|---|---|
General | Enter general details for the workflow. |
Table | Edit the statuses, transitions, and dialogs that make up the workflow. |
Graph | A graphical representation of the workflow. |
Processing | Default processing settings for the workflow, such as automatic deadlines, etc. |
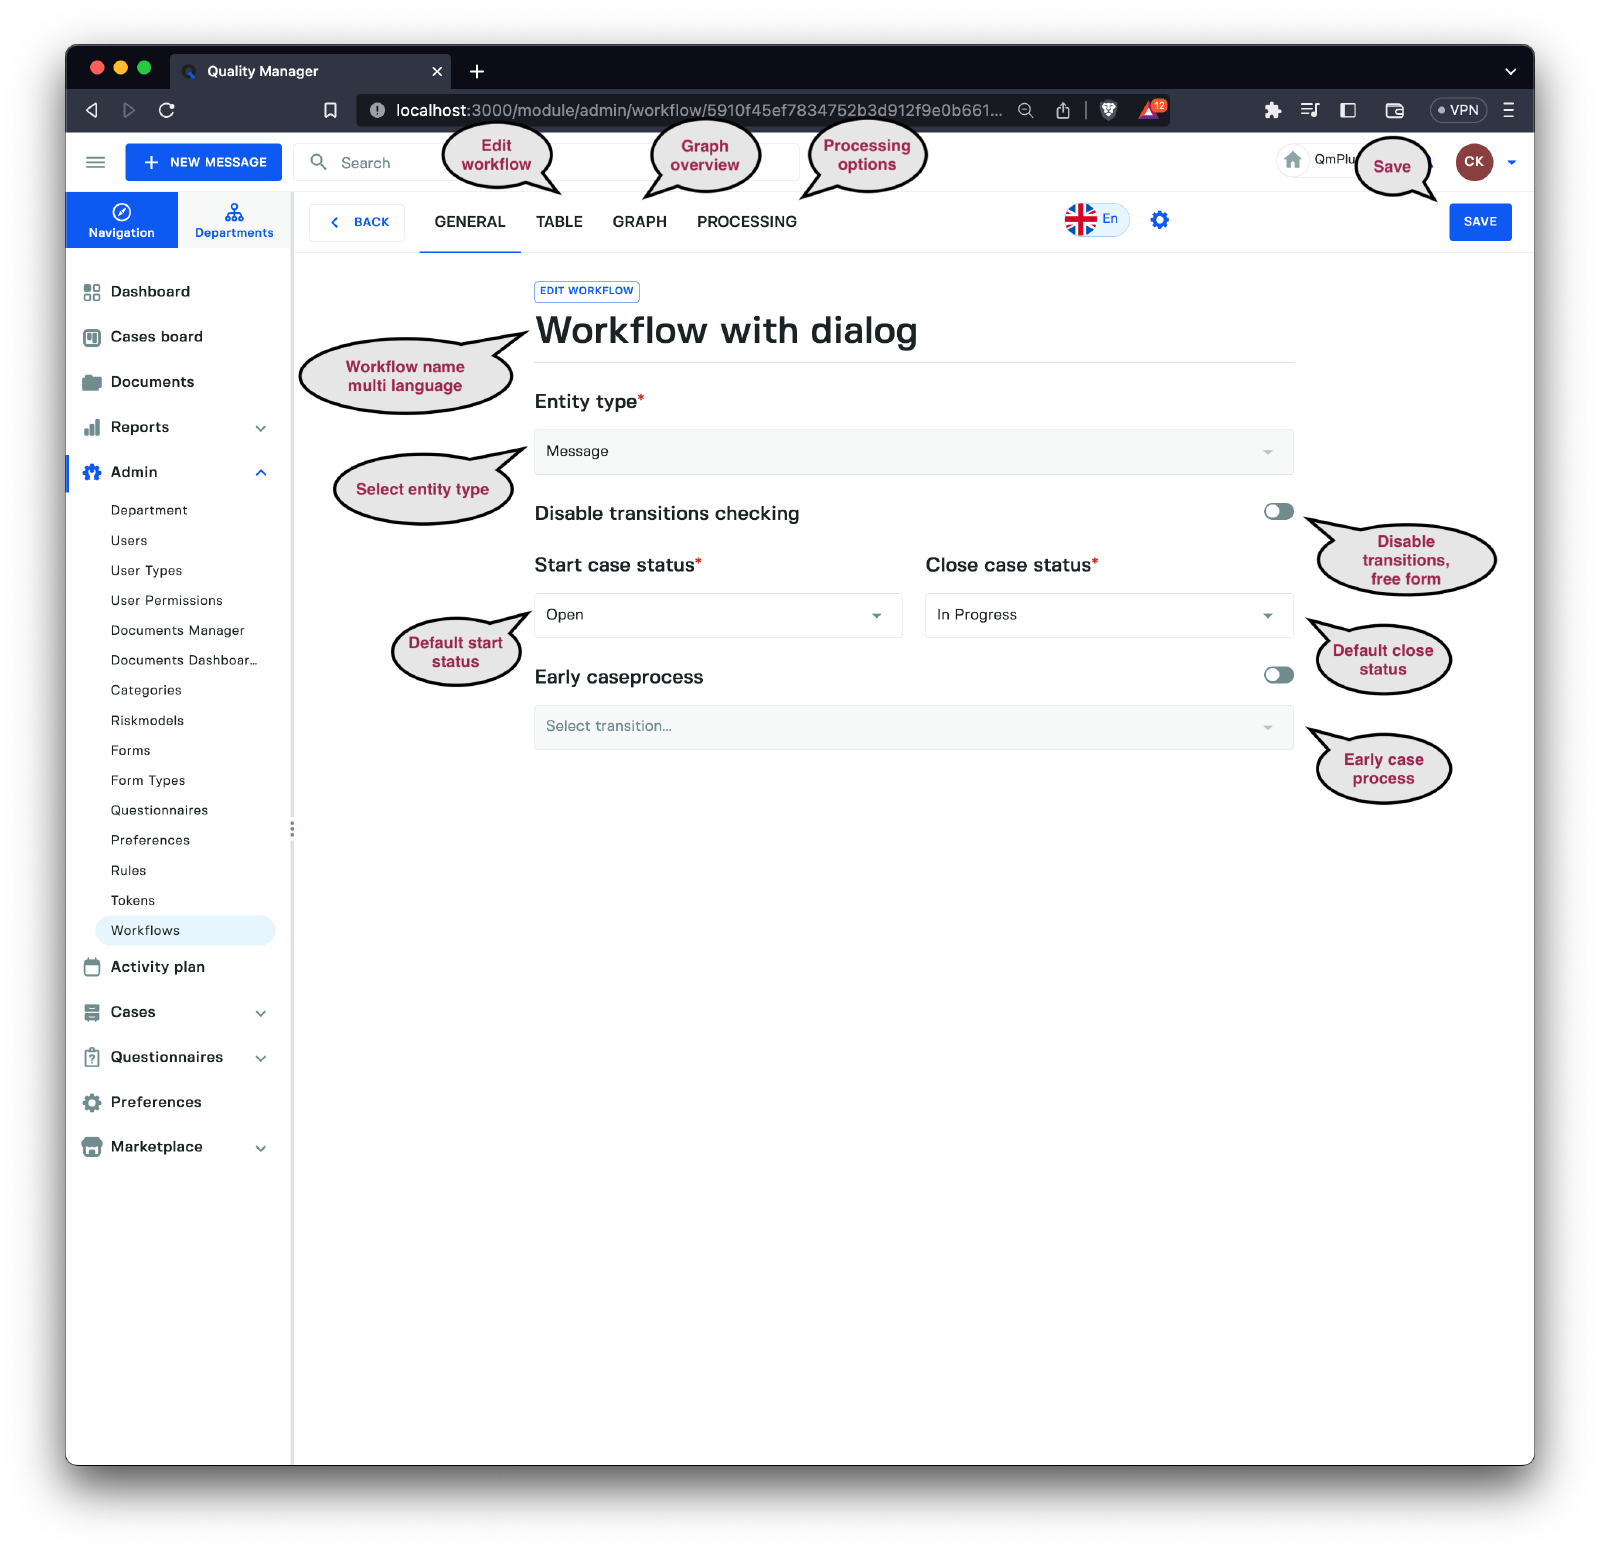
General Tab
The general page allows us to fill out the following fields.
| Field | Description |
|---|---|
Title | Specify the title of the workflow; support multiple languages if your account is configured for it. |
Entity Type | Select the entity type of the workflow; once set, it cannot be changed. This can be Message, Action, Document, Hearing, or Audit. |
Disable transitions checking | This allows you to override any transitions, making it possible to freely move tickets between any transitions on the case board. Great for implementing Kanban processes or other non-gated processes. |
Start case status | Set the default case start status. This is the case status that will be assigned to a new case for this workflow if no other rules override it. |
Close case status | Set the default close case status used for default close operations. |
Early case process | Specify that this workflow supports the use of Early case process rules set up to assign new cases to case handlers based on specified rules. |
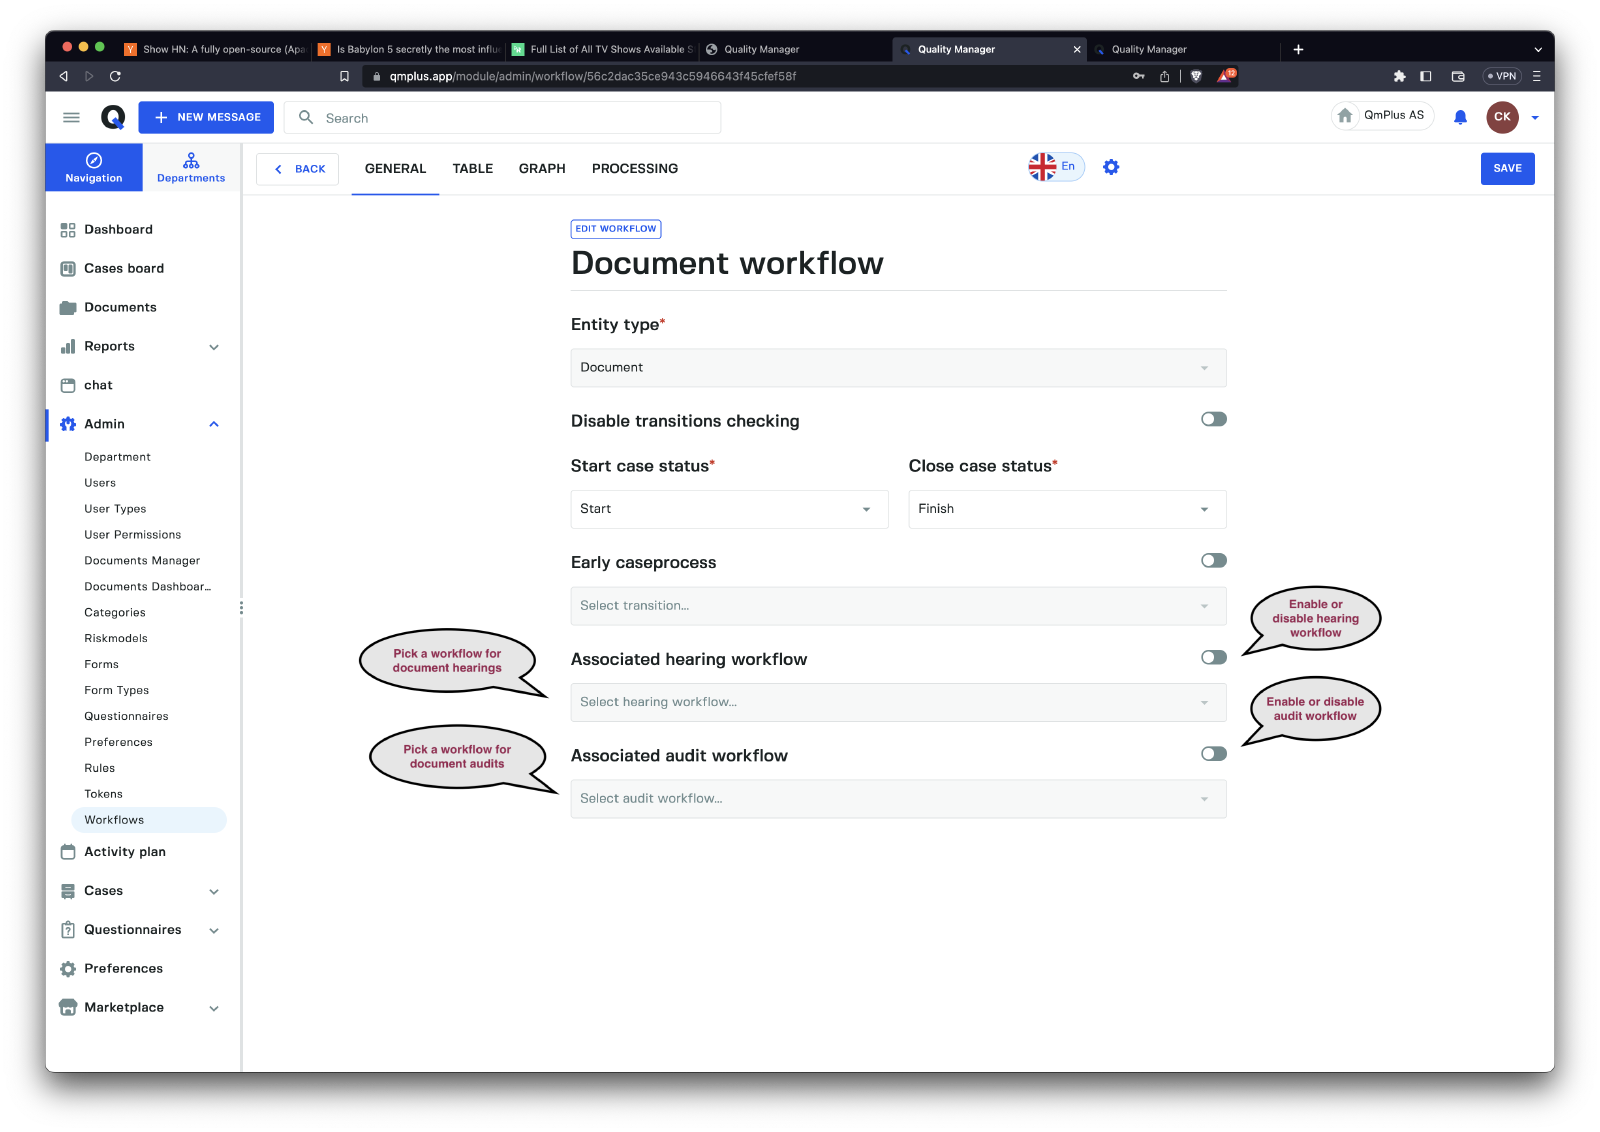
Associated hearing workflow | Document only. Allows you to specify an associated hearings workflow for this document workflow that will handle any hearings initiated for a document attached to this workflow. |
Associated audit workflow | Document only. Allows you to specify an associated audit workflow for this document workflow to handle all hearings. |
Table Tab
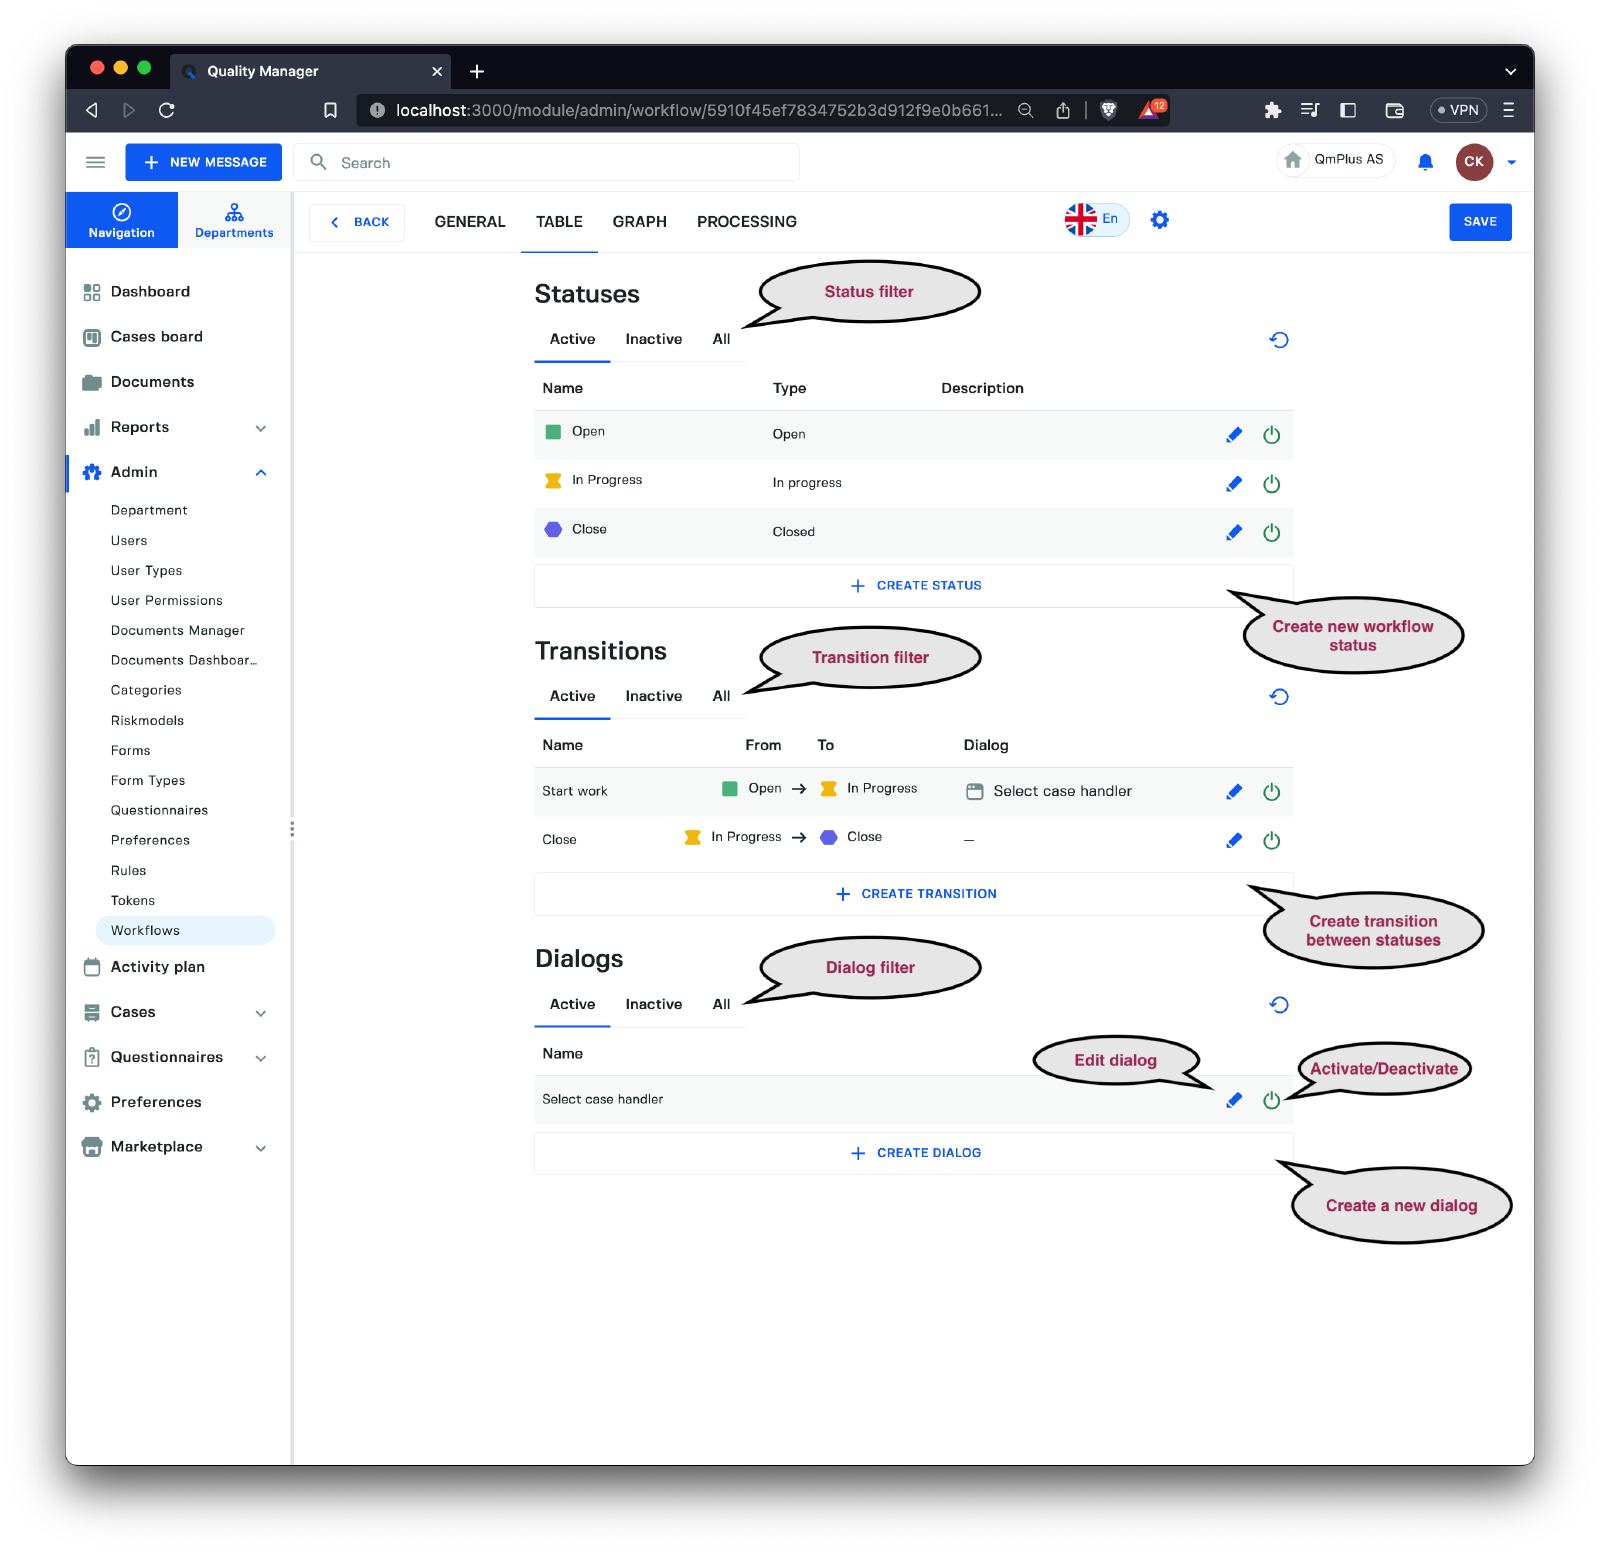
The Table Tab allows us to build and modify the workflow entities. There are three types of available entities.
| Entity | Description |
|---|---|
Case Status | Case statuses are defined states a case can be in. For example, you might have a case status called New for a newly registered form entry and Closed for the final possible state for a case. |
Transitions | Transitions control the flow of cases between case statuses. It makes it possible to enforce a workflow by specifying the legal transitions between statuses. For example, you might make it possible to only move a case from New to Under work by adding a single transition between those statuses. |
DONE
| Dialogs | Dialogs are collections of fields that can be attached to a transition. For example, you might decide that you want the user to add a comment when moving a case from the case status New to Under work, and a dialog attached to this transition between those fields will prompt the dialog to pop up for the user to fill out when moving between the statuses. |
Create Status
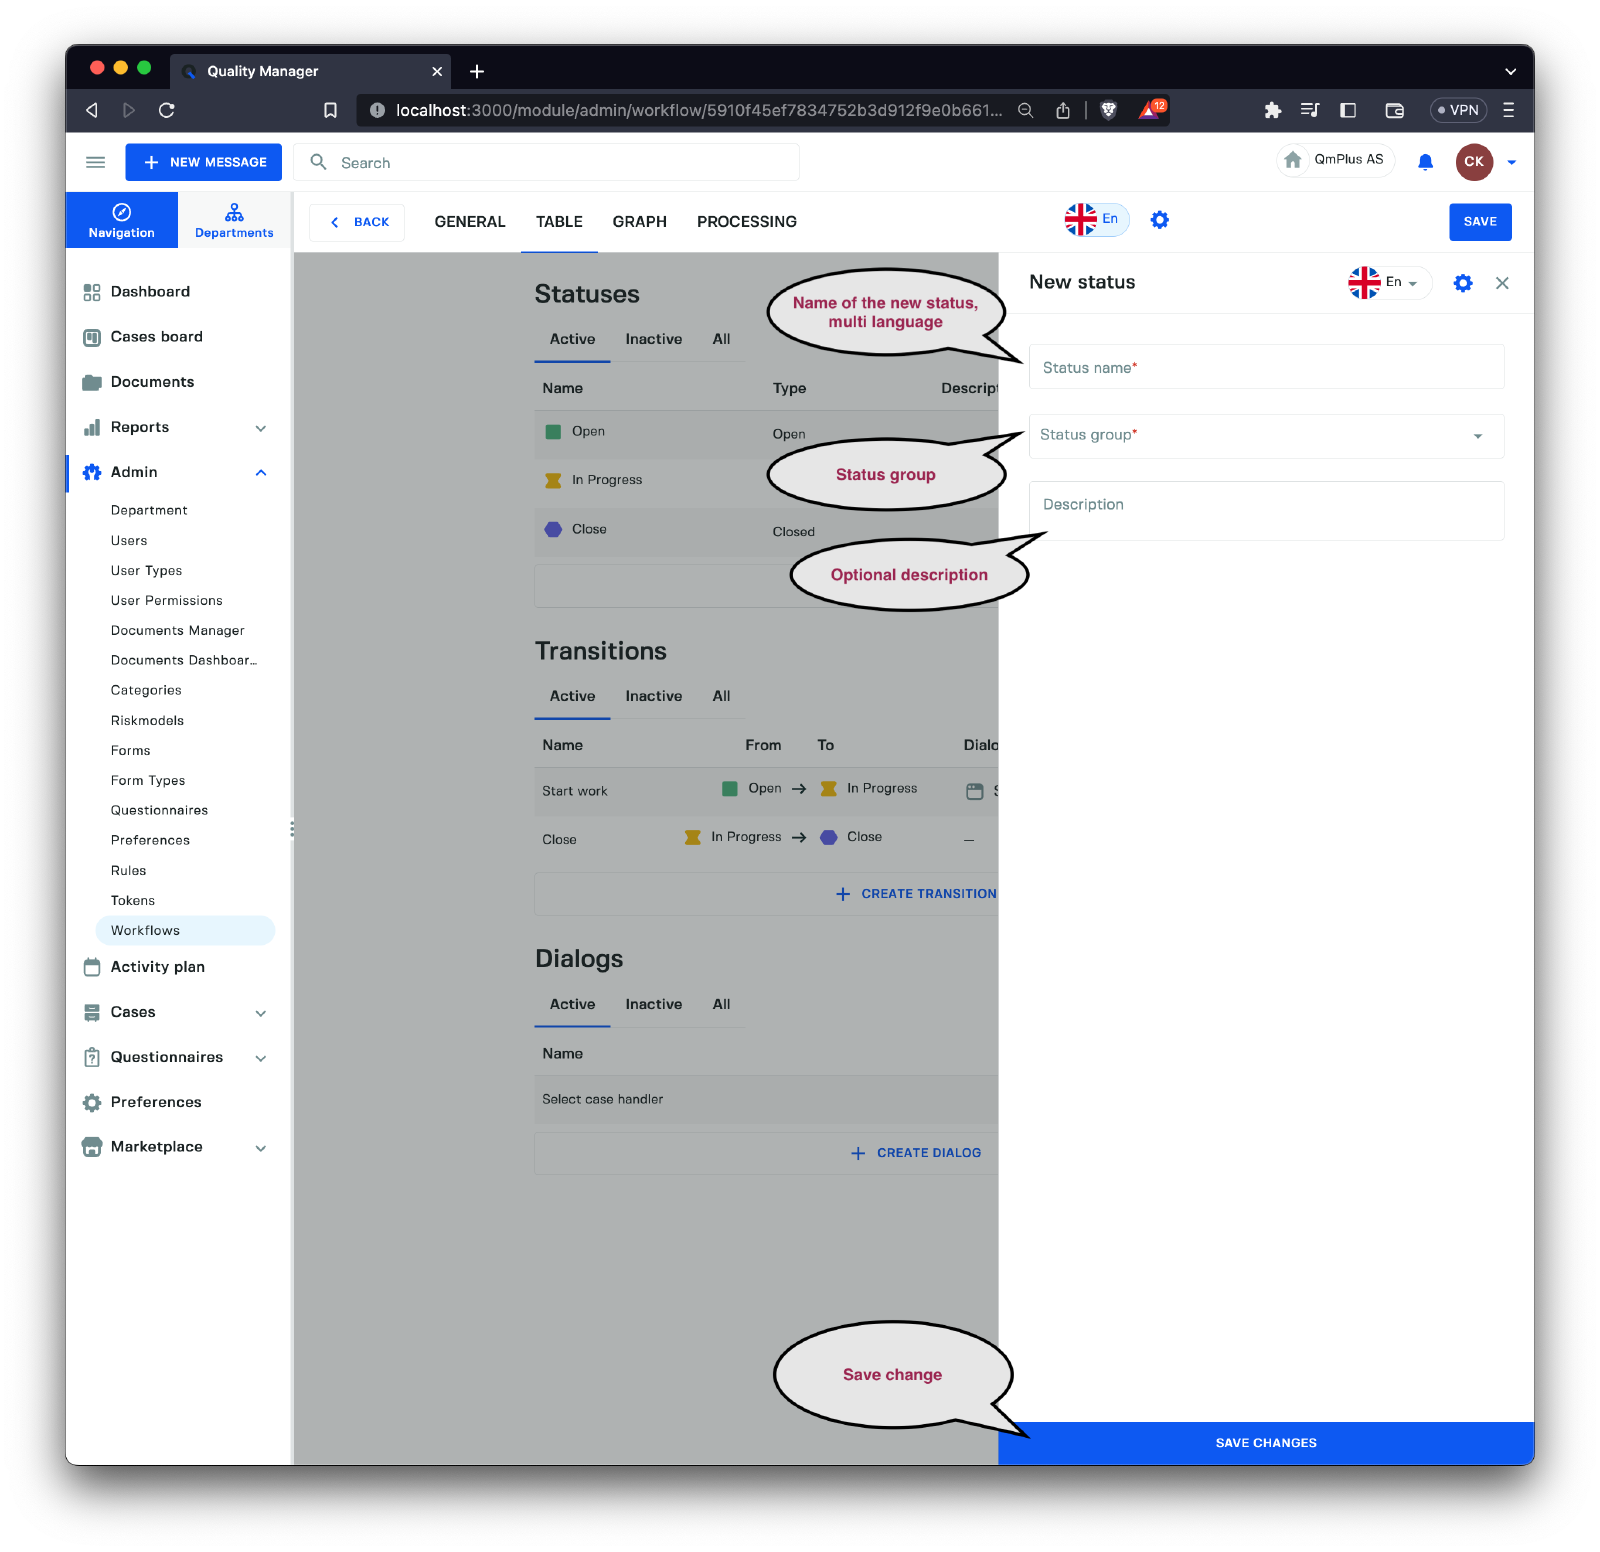
To create a new Case status, you need to enter the following fields.
| Field | Description |
|---|---|
Name | The name of the case status, supporting multiple languages. |
Status Group | The Status Group for this Case Status (see the table below for explanations). |
Description | An optional description for the case status. |
The possible Status Groups are detailed below.
| Status Group | Description |
|---|---|
Open | A case is in a newly opened state (the first time it was opened). This is primarily used to signal a new case starting. |
Unprocessed | A case has been created but not yet opened by any case handler. |
In progress | A case is being worked on. |
In action process | A case triggered an action process and is waiting for it to be resolved. |
Closed | A case has been closed. |
Deleted | A case has been deleted. |
Create Transitions
A transition represents a change between two statuses (for example, you might move a case from New status to Being worked on status).
A transition can have an optional dialog attached to it to collect information as part of the transition.
When we talk about transitions, we will use
sourceas the start status of the transition andtargetas the end status.
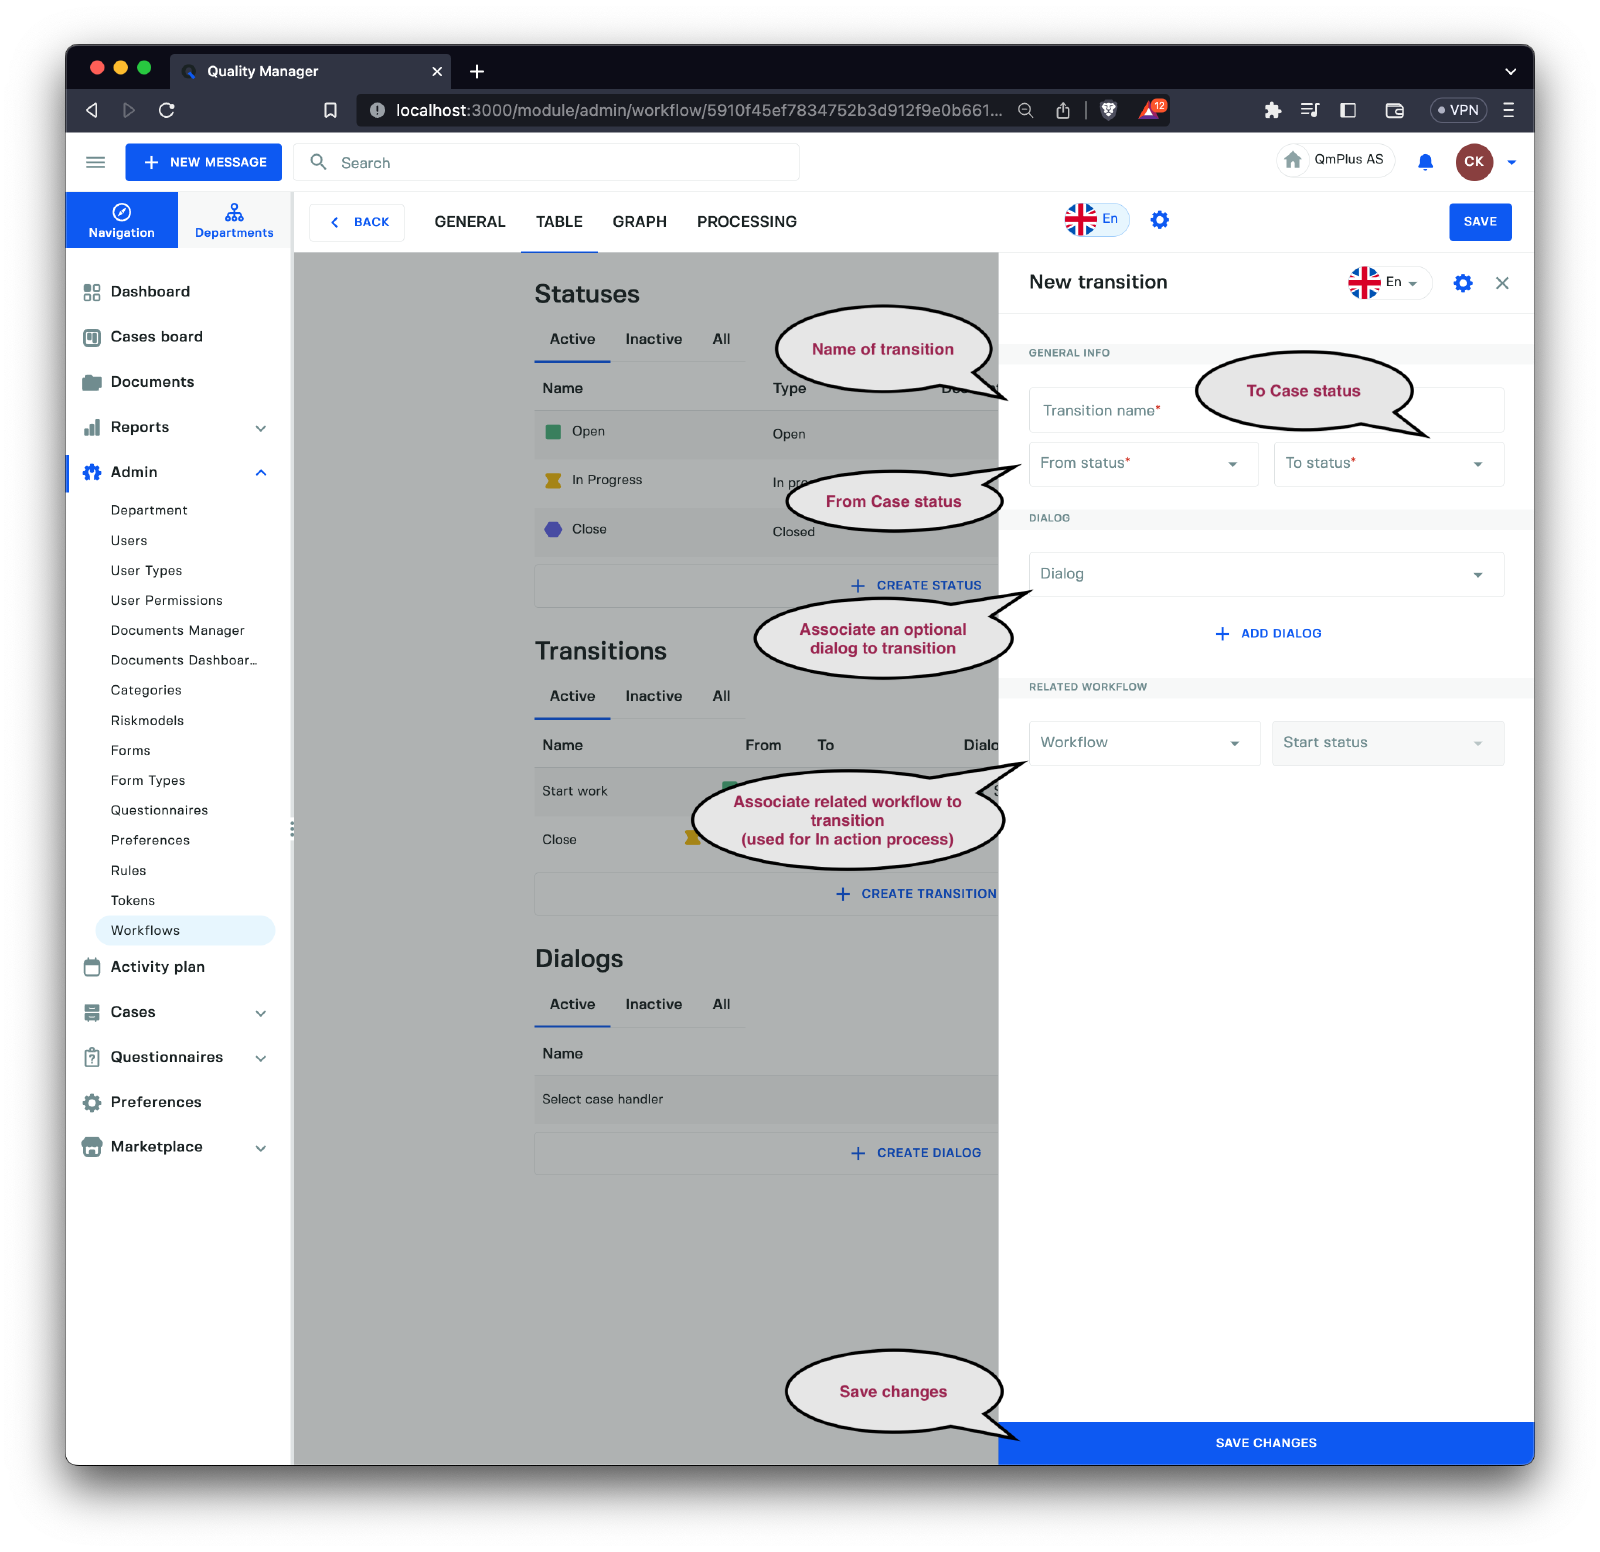
We have the following fields when creating a transition.
| Field | Description |
|---|---|
Transition Name | The name of the Transition we are defining. |
From status | The starting Case Status for the transition. |
To status | The ending Case Status for the transition. |
Dialog | An optional dialog attached to the transition. |
Related Workflow | When transitioning to a Case Status of the Status Group In action process, we can set a related workflow that will be used to trigger the creation of a new Action when this transition is performed. This option is currently only available for Message Workflows. |
Start Status | Specify what status a newly created Action should have in the Related Workflow. |
The Related Workflow option is only used when the
To statusis aCase Statusof the Status GroupIn action process.
Create Dialog
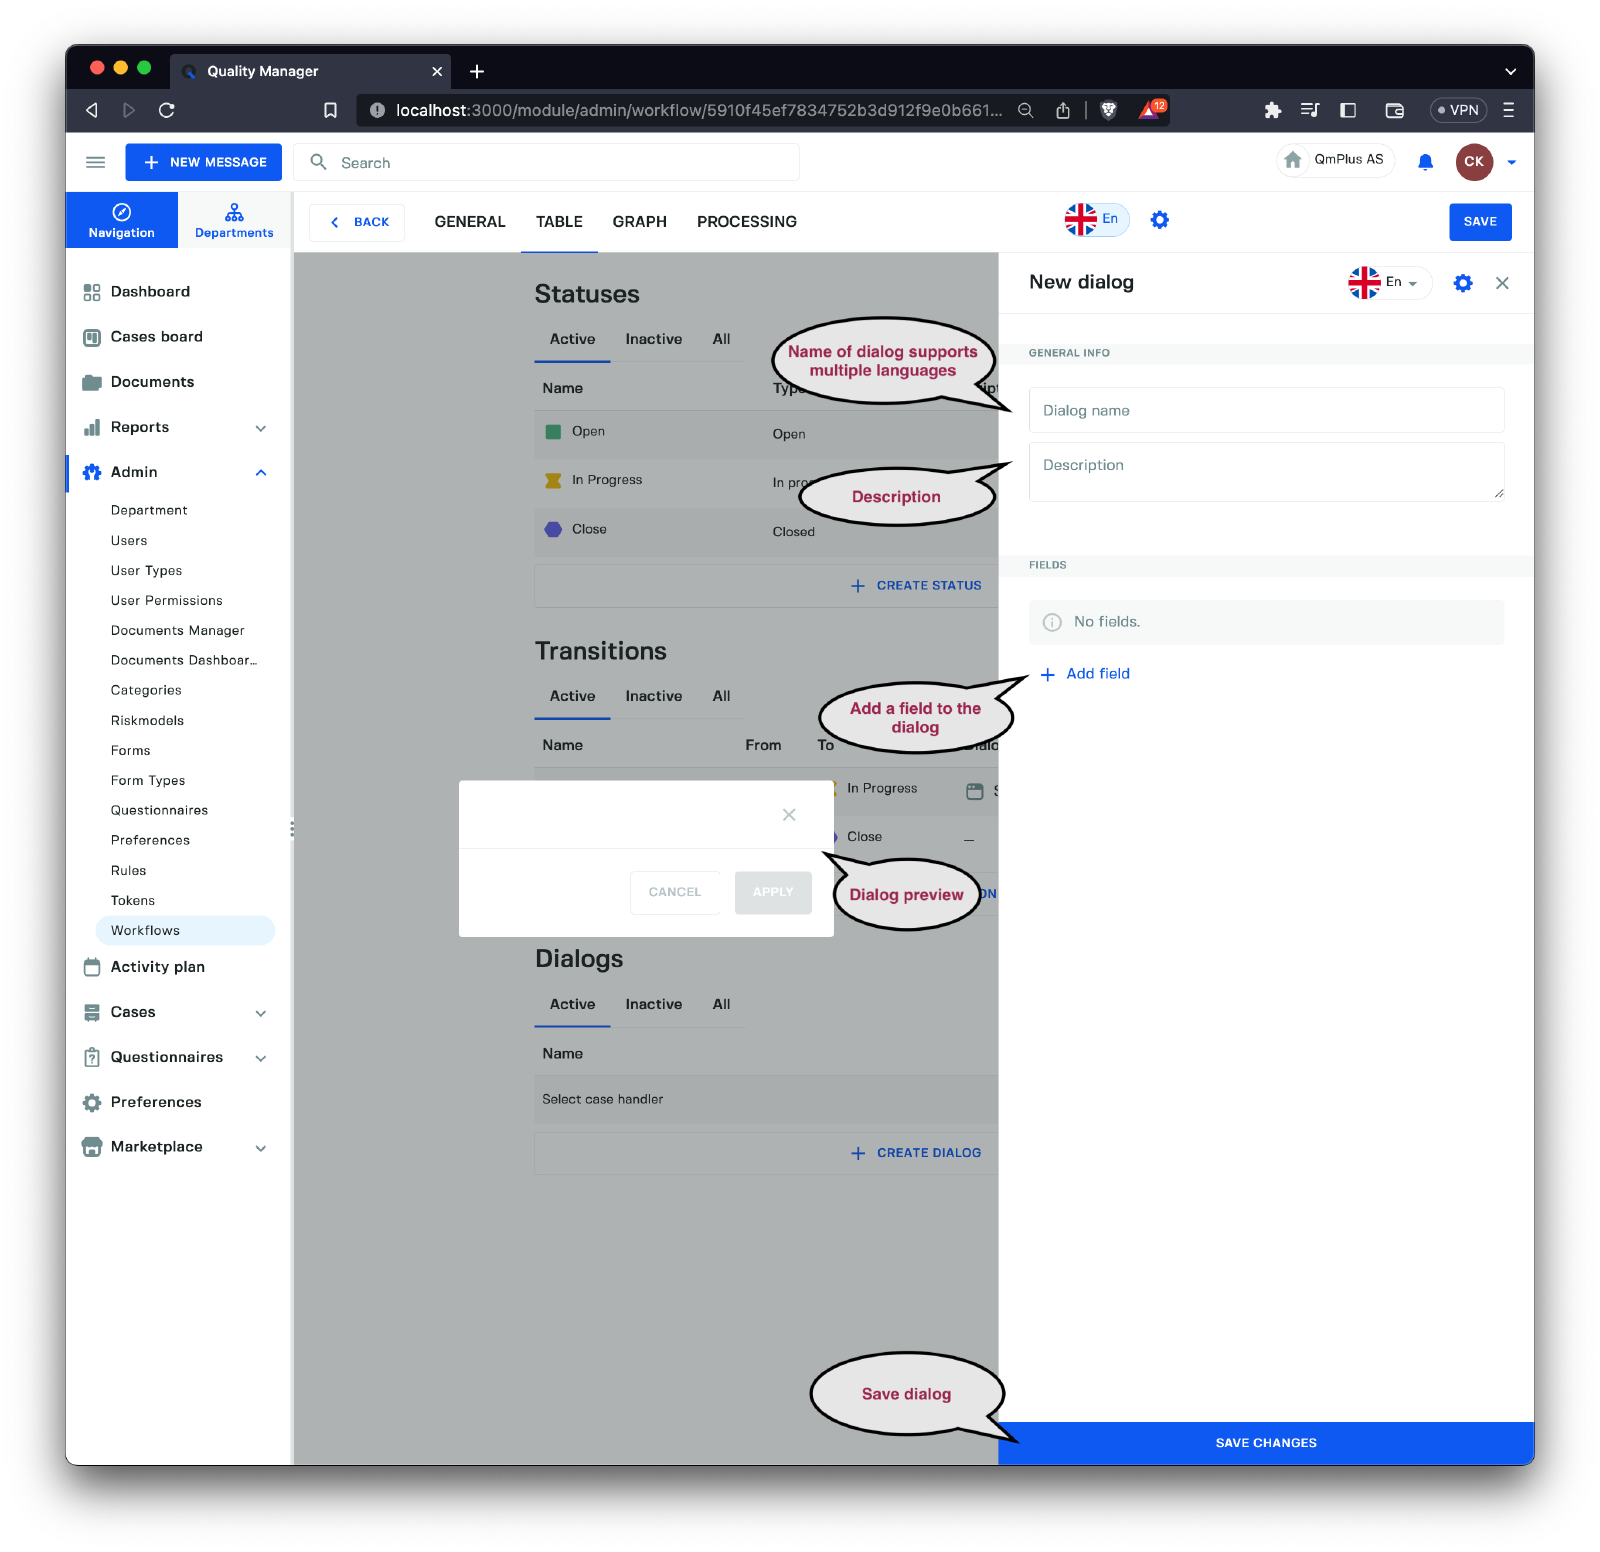
A dialog represents a set of fields configurable by the end user to collect information or trigger actions on a change of status for a case (a transition). Dialogs are attached to transitions.
The fields you can specify are as follows:
| Field | Description |
|---|---|
Dialog name | The name of the workflow dialog, supporting multiple languages. |
Description | An optional description for the dialog. |
Fields | The list of fields used in the dialog. |
DONE
As you can see, there is a sizable selection of field types. Let’s examine each and understand their significance before constructing our custom dialog.
| Field Type | Triggers | Description |
|---|---|---|
Textfield | No | A single-row free text entry field. |
Textarea | No | A text area with more columns for free text entry. |
Text Editor | A text area with basic formatting for free text entry. | |
Number | No | Allows entering any numeric value. |
Date | No | Used for specifying a date. |
Perform Task | Yes | A field allowing you to specify who performed the task. |
Action Name | Yes | The title field that will be used when creating a new Action entry for a transition going into an In action process group state. |
Comment | Yes | Allows the user to comment on the transition between states and set who is getting notified about the comment. |
Acknowledgement | Yes | Lets the user acknowledge that specific users performed their tasks. |
Task Assignment Setup | Yes | Allows the user to create tasks of a specific type when transitioning between statuses. One can also control if one wants to collect a Due date, Planned hours, and Planned start date. |
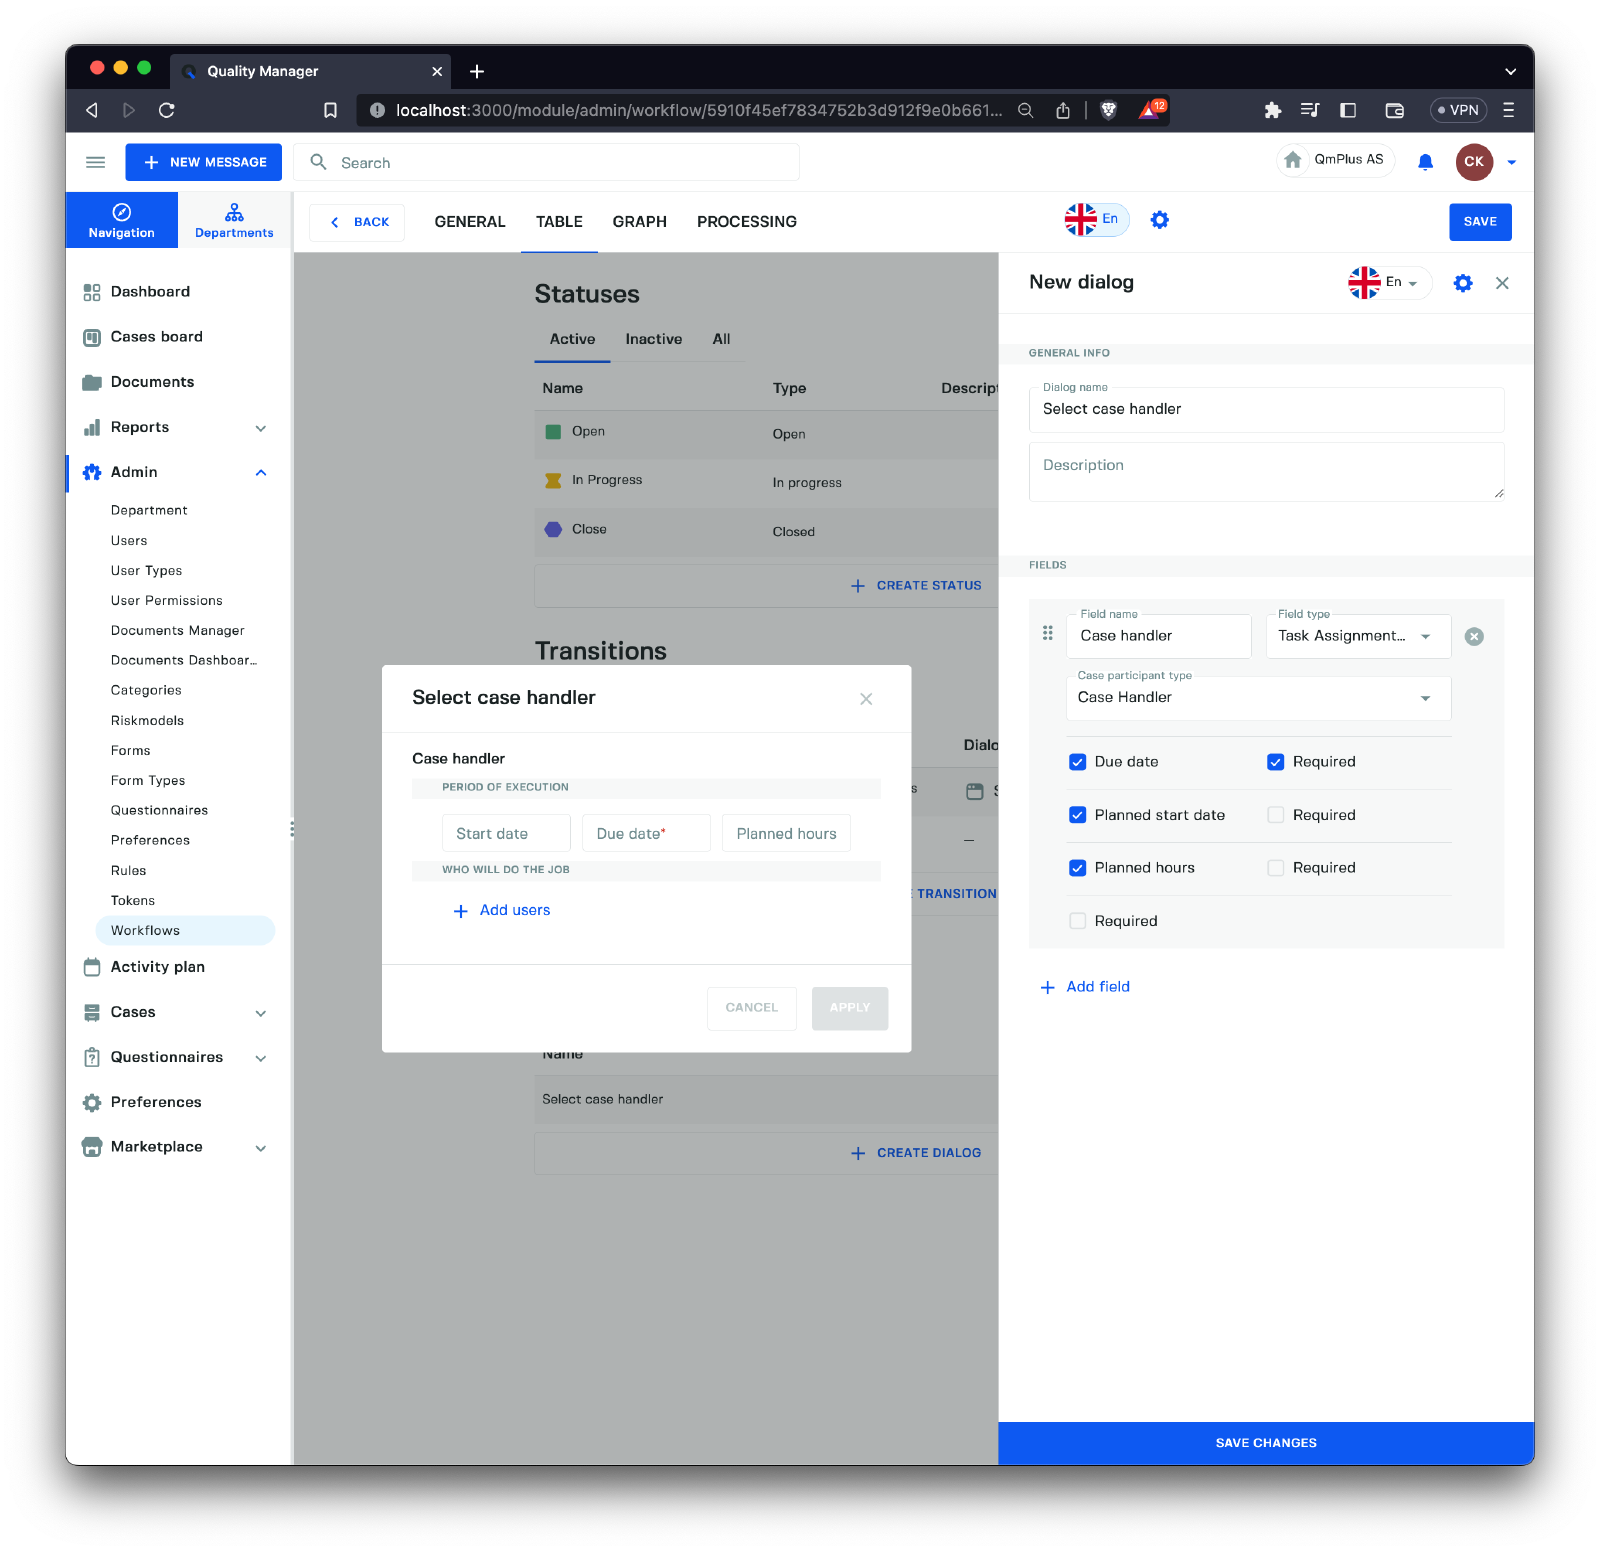
You can add fields to the dialog, seeing the preview of the dialog on the left-hand side. Once you have specified all the fields, you can click the Save Changes button at the bottom right to save the changes to the workflow.
Graph Tab
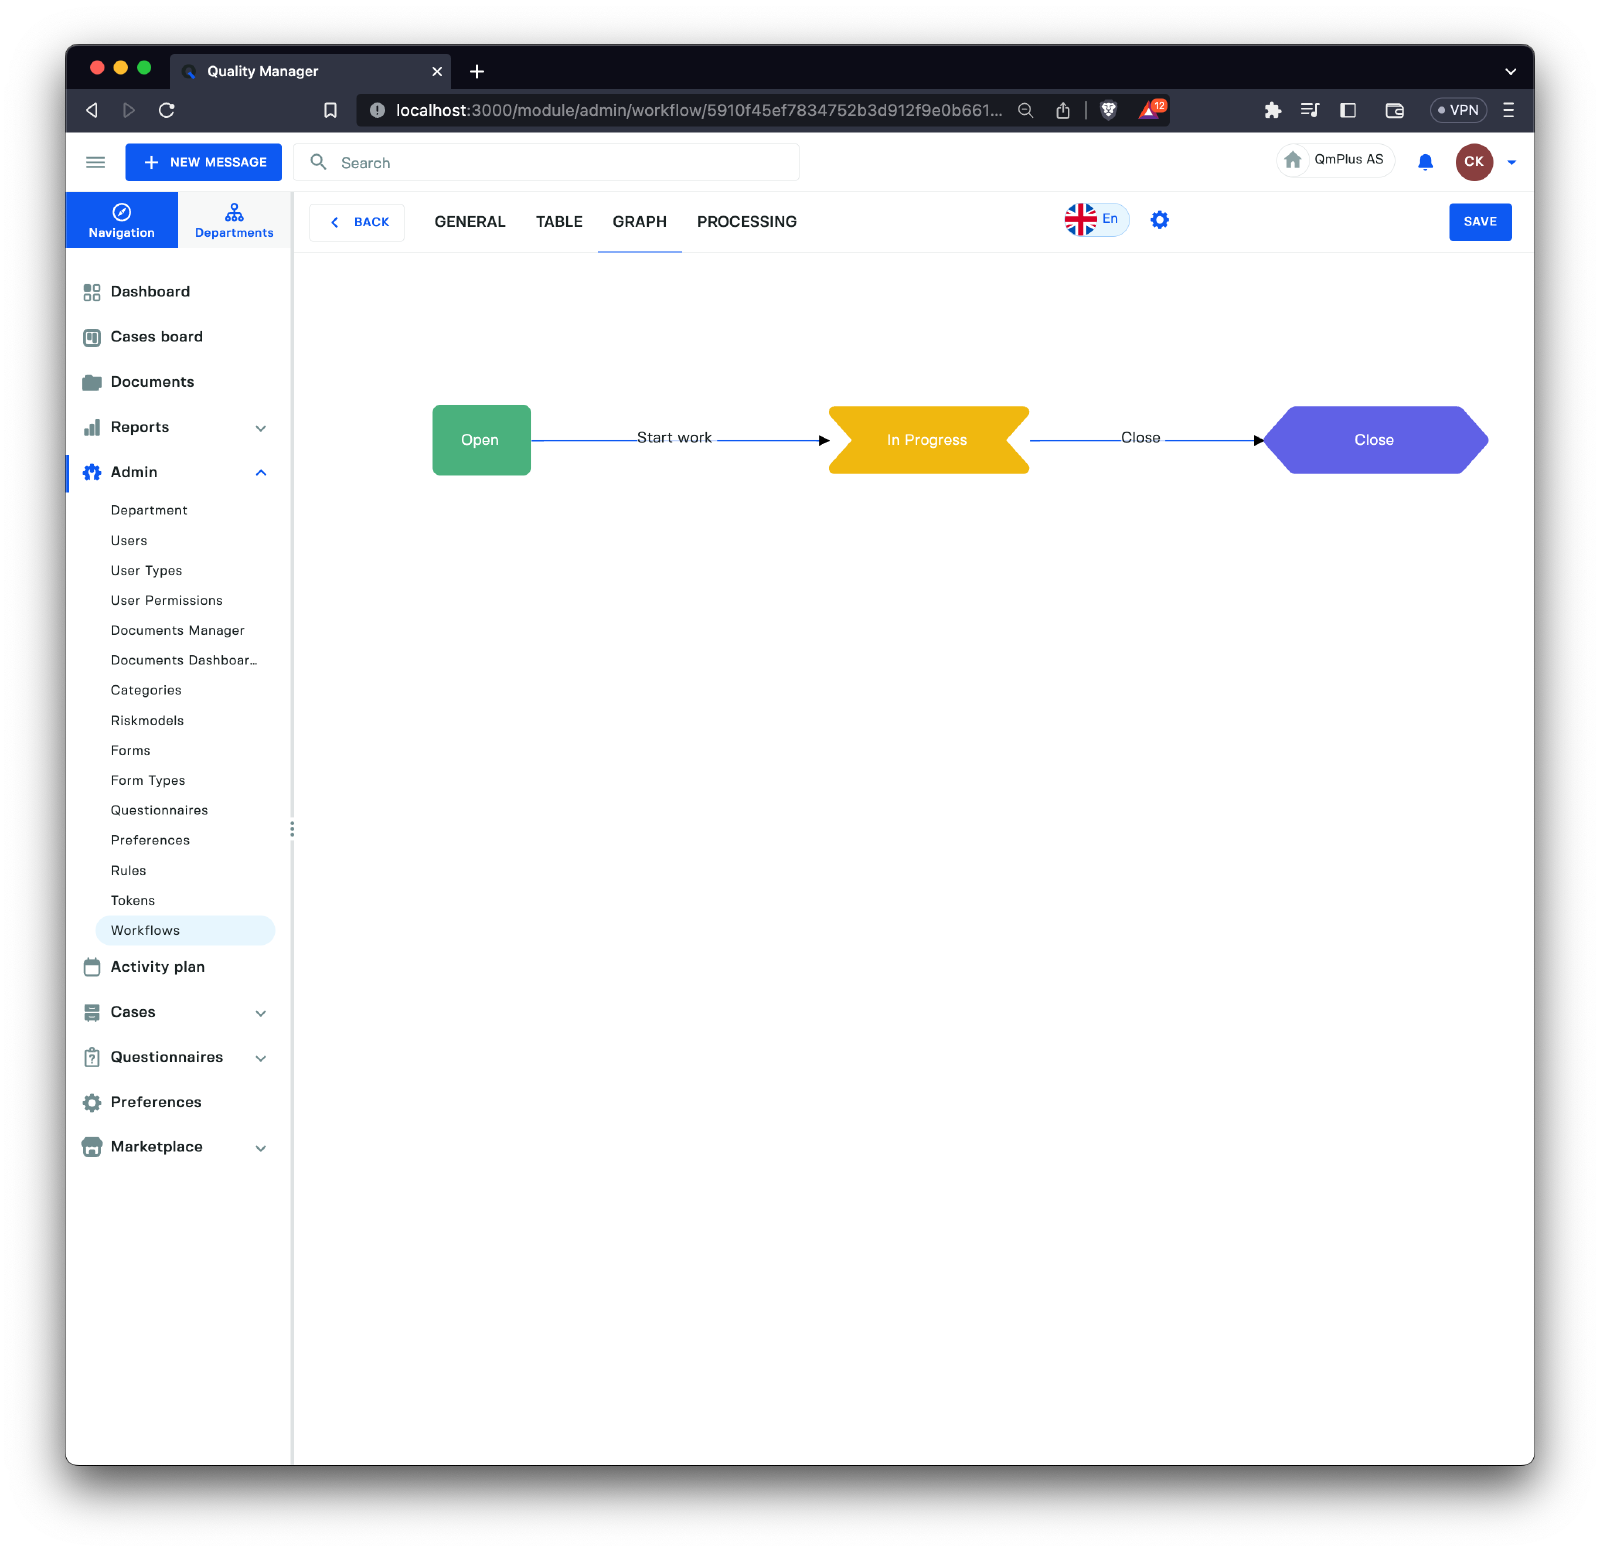
The Graph Tab shows a graphical representation of the workflow. Each box represents a Case Status in the workflow, and each line between the Case Statuses represents a transition between two states. The above workflow is very simple; below is a more complex workflow example.
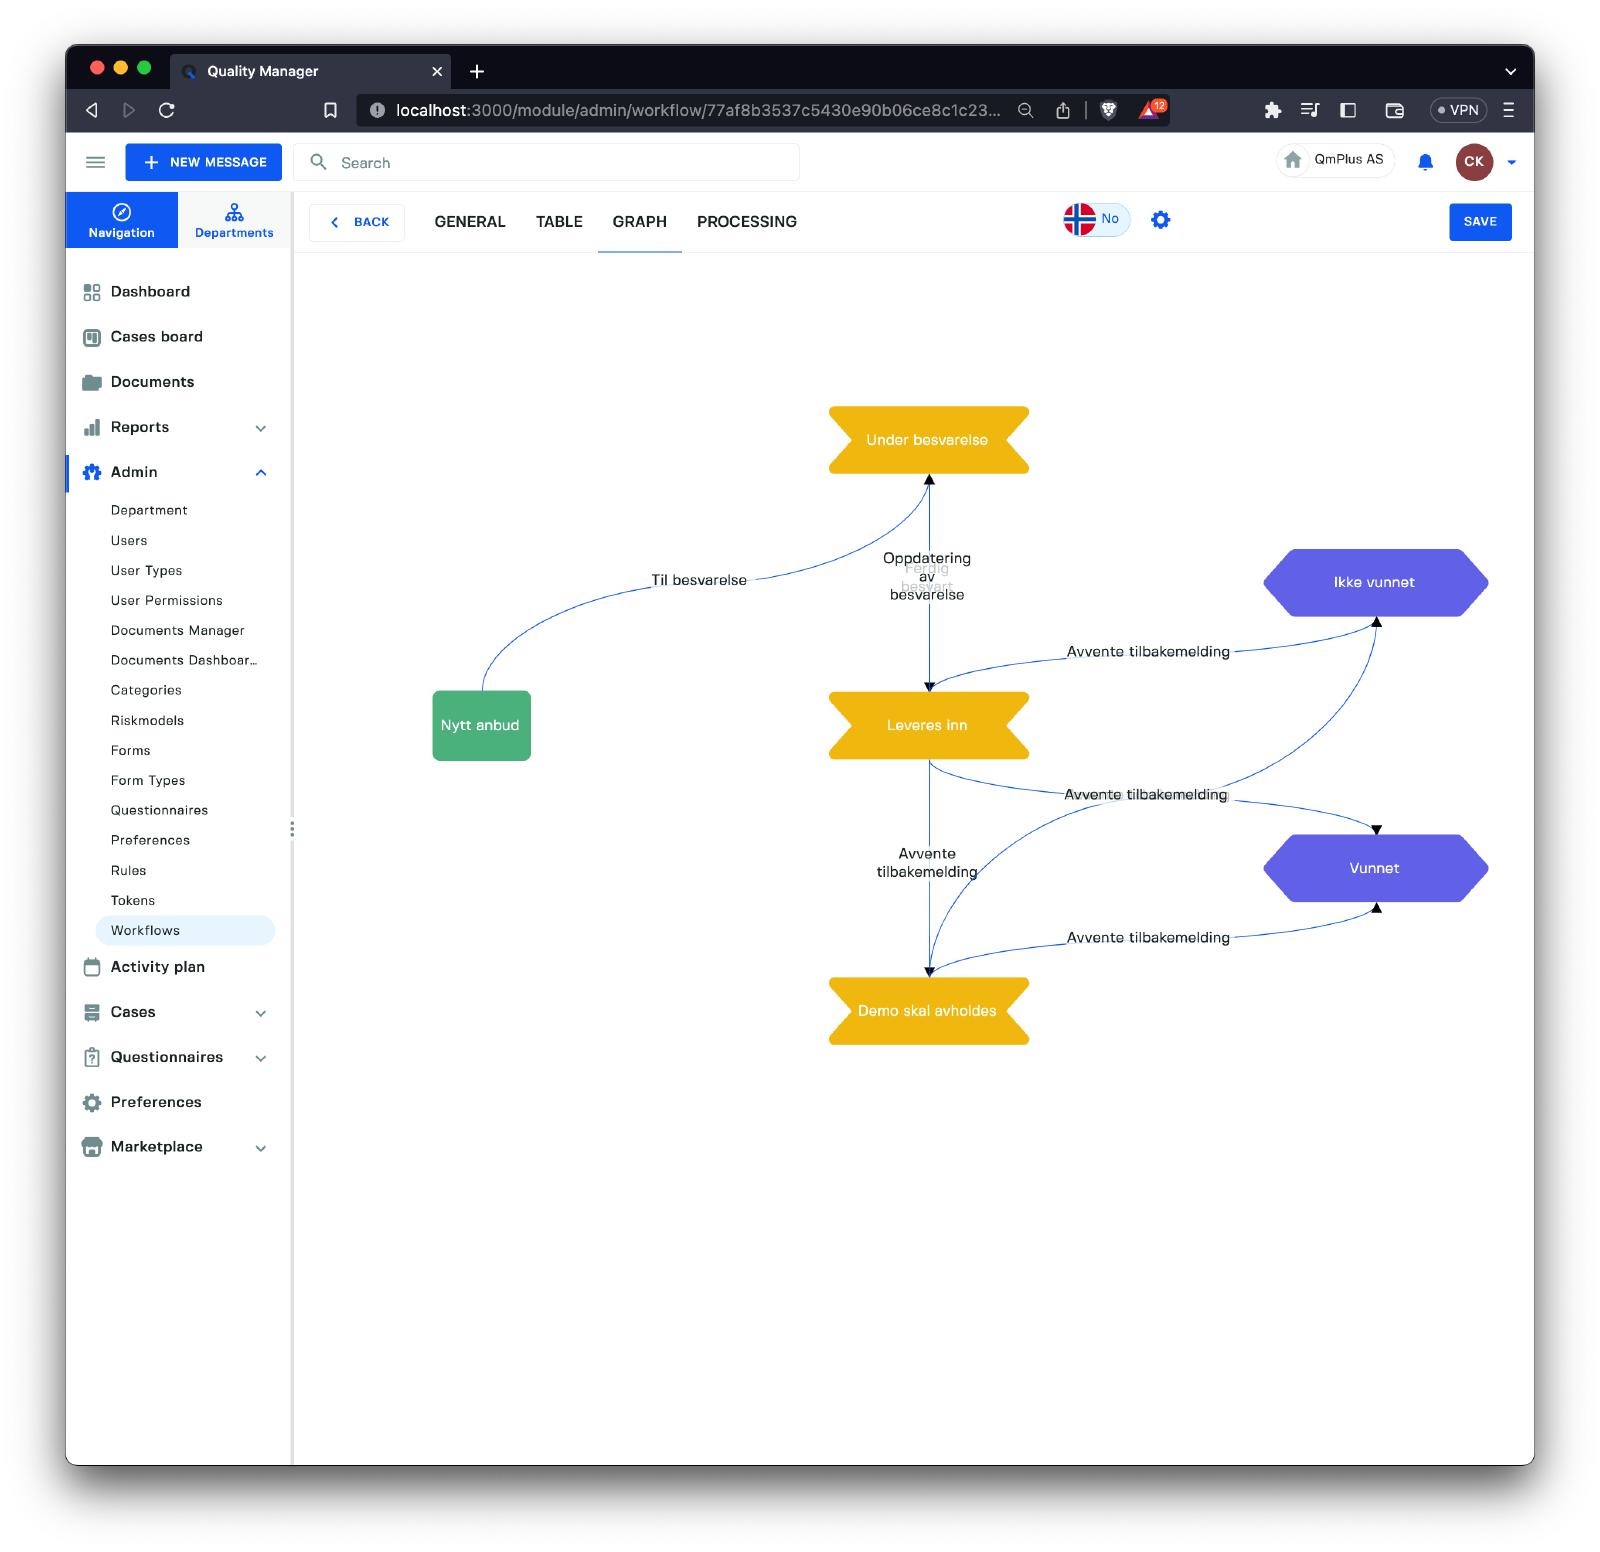
Use the
Graph Tabto validate your workflow and ensure you did not miss any transitions. ACase Statuswithout any transitions is a typical signal that one might have missed a transition or that theCase Statusis not needed.
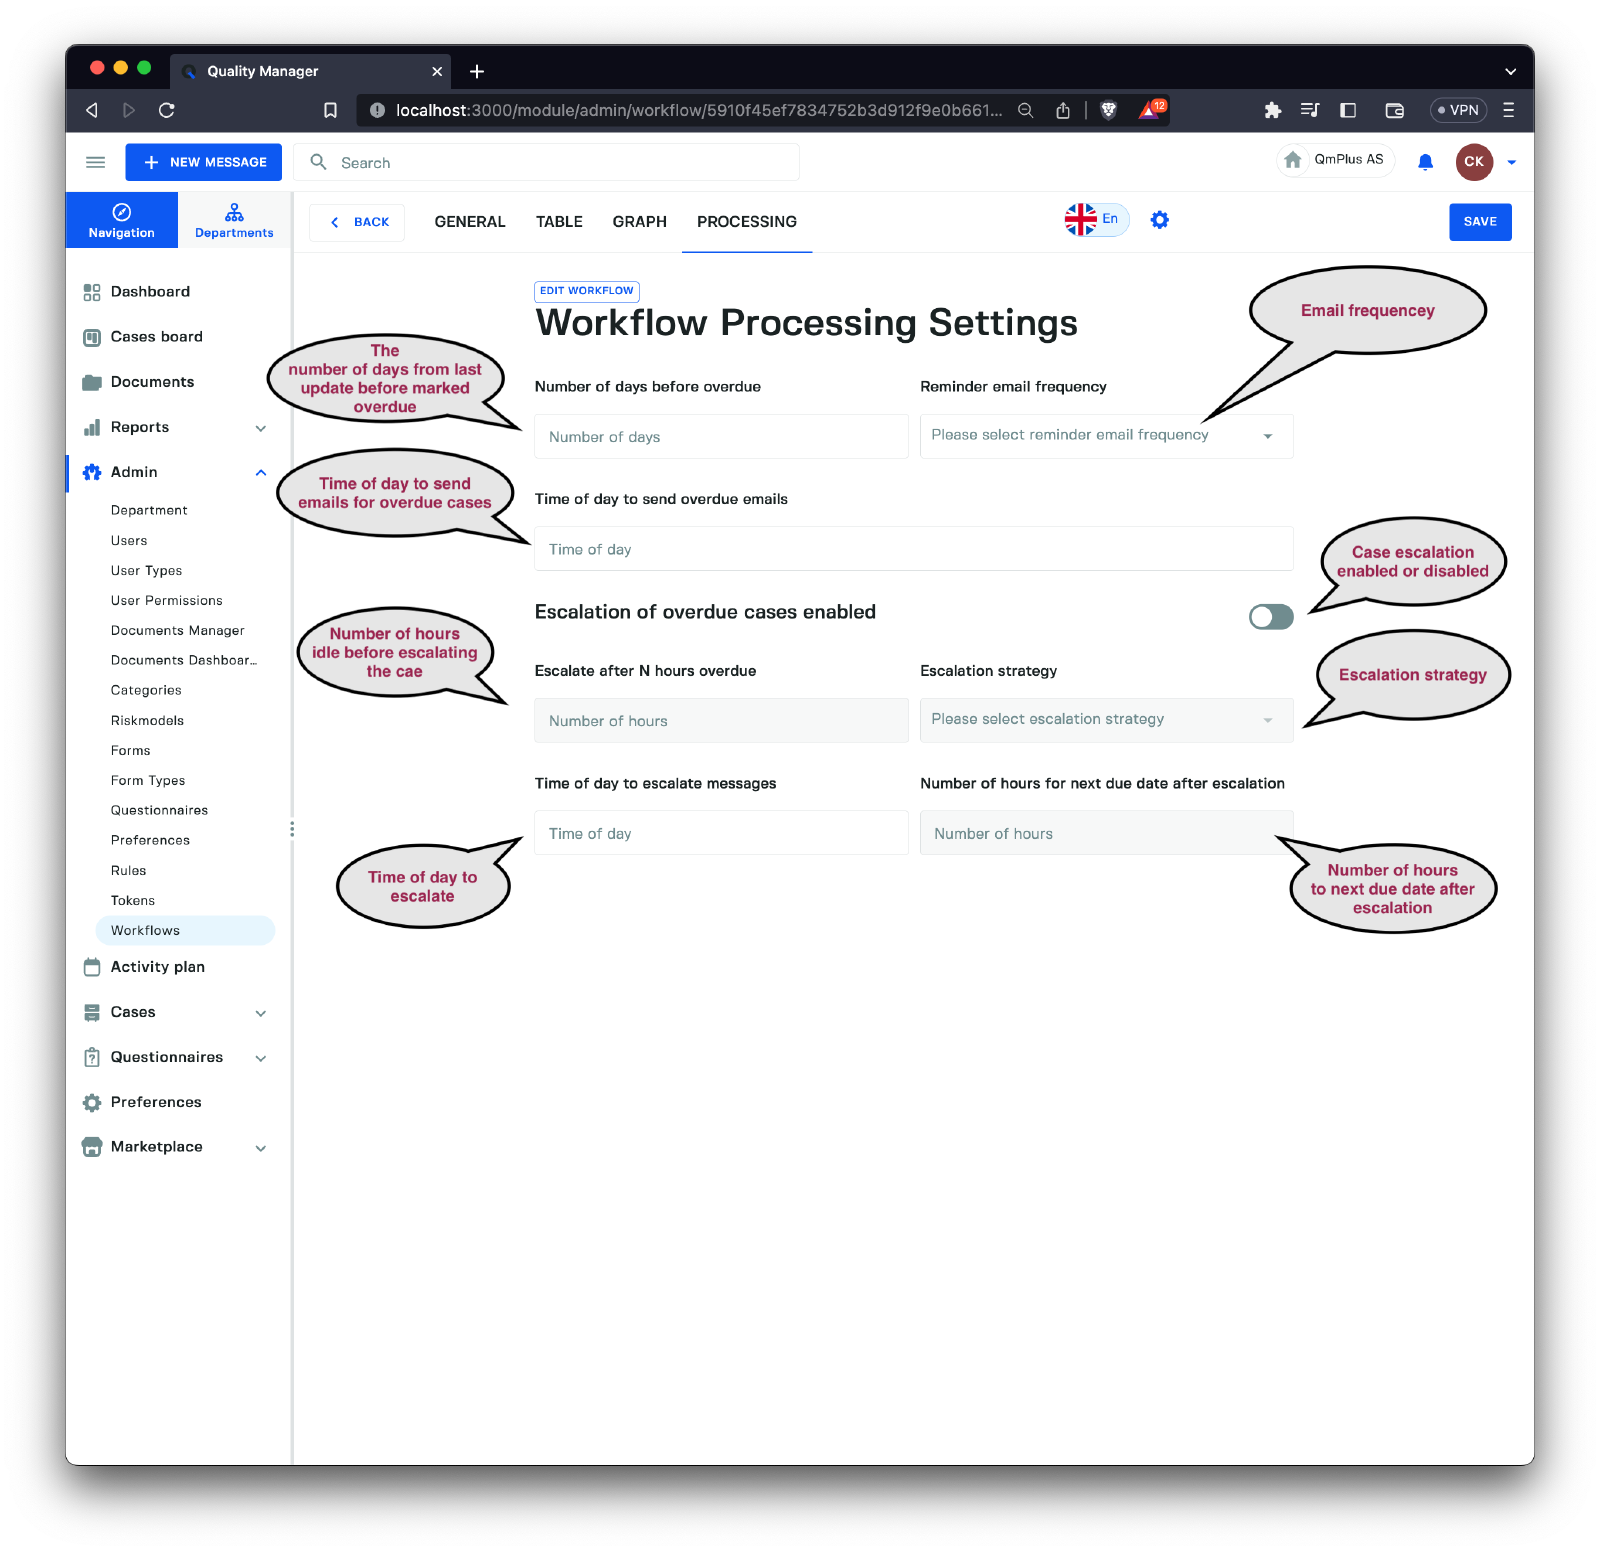
Processing Tab
The processing tab contains settings to set defaults for case deadlines and escalations for all form types and forms associated with this particular workflow.
Due dates
Allows the control of how due date notifications are handled. This allows one to set general due date handling settings for this workflow and thus forms using this workflow.
Formslet you override these so you can, for example, have a formAccidentwith much shorter automatic due dates compared to the general workflow.Formsettings will override the workflow.
The available fields.
| Field | Description |
|---|---|
Number of days before overdue | The number of days since the last update happened to a case before it’s considered overdue. |
Reminder email frequency | The frequency of sending overdue email notifications. These are options like Off, Every day, Everyone Monday, etc. |
Time of day to send overdue emails | Specify the time of day to send the email. For example, you might want overdue notices to be delivered after 9 in the morning. This is not an exact time. The email will be sent sometime after the specified time, depending on your email system and sending time. |
Escalation
Allows the control of how escalations are handled. This allows one to set general escalation handling settings for this workflow and thus forms using this workflow.
Formslet you override these so you can, for example, have a formAccidentwith much shorter automatic escalation dates compared to the general workflow.Formsettings will override the workflow.
The available fields.
| Field | Description |
|---|---|
Escalation of overdue cases enabled | Enable or disable the escalation. |
Escalate after N hours overdue | The number of hours since the last case update happened before it’s considered for escalation. |
Escalation strategy | The strategy to pick to whom to escalate the case. See available strategies below. |
Time of day to escalate messages | What time of the day to escalate messages. |
Number of hours for next due date after escalation | The next due date after escalating the case to a new case handler. |
The available strategies.
| Strategy | Description |
|---|---|
Direct supervisor | The case will be sent to the person’s closest direct supervisor with permission to process cases. If there is more than one potential supervisor, one of them will be picked at random. |
Time of day to send overdue emails | Specify the time of day to send the email. For example you might overdue notices to be delivered after 9 in the morning. This is not an exact time. The email some time after the specified time depending on your email system and sending time. |
Escalation
Allows the control of how escalations are handled. This allows one to set general escalation handling settings for this workflow and thus forms using this workflow.
Formslet you override these so you can for example have a formAccidentthat have much shorter automatic escalation date compared to the general workflow.Formsettings will override the workflow.
The available fields.
| Field | Description |
|---|---|
Escalation of overdue cases enabled | Enable or disable the escalation. |
Escalate after N hours overdue | The number of hours since the last case update happened before it’s considered for escalation. |
Escalation strategy | The strategy to pick to whom to escalate the case. See available strategies below. |
Time of day to escalate mesages | What time of the day to escalate messages. |
Number of hours for next due date after escalation | The next due date after escalating the case to a new case handler. |
The available strategies.
| Strategy | Description |
|---|---|
Direct supervisor | The case will be sent to the persons closest direct supervisor with permission to process cases. If there are more than one potential supervisor it will pick on of them on random. |